My knee has been aching after my roller sessions. Left knee -- the one that was scoped to remove some damaged cartilege, following an MS-200 ride with a misaligned cleat, years ago. Knee aches make me wary, so the other night I swapped my Look pedals for a set of one-sided MKS track pedals. These had been on my daughters' the trailer bike before I bought a set of double-sided pedals for it, late last season. They are simple and narrow, and have no toe clips or straps of any kind.
I tried them during my Wed AM workout, yesterday, with a set of well-lugged trail-running shoes that "lock in" to the MKS pedals pretty nicely. They took zero getting used to -- didn't feel funny or disconnected at all. And I wasn't any slower over the 10 miles than I normally am, including the mile I try to sustain 22mph.
I'm not sure I'll go back. The Kestrel is the last bike I'm using clipless pedals on, and I like them -- don't get me wrong. But I like my knees, too. And the $50 I'd spend for the fitting appointment would spend just as easily on a new set of tires and tubes, for which I'm currently trolling the closeout sections of Nashbar and Performance.
All for now,
J
Thursday, January 28, 2010
Saturday, January 23, 2010
Crank Swap -- Part 1
 This weekend I started the process of swapping cranks and bottom brackets. So far it's gone pretty cleanly and easily, and thus far, I haven't had to order any parts, though I doubt that's going to hold true. Here's what's up:
I started the project late Saturday with a small pile of tools and a transparent straightedge with metric and English rules. I have a set of calipers, but the ruler is close enough for what I needed. What I was interested in is what's called Q-factor. Q-factor is essentially the distance between the outer faces of the crank arms, at the pedals. This is important because it determines how far apart your feet will be as you ride your bike.
Q factor is really easy to measure, but not with the cranks in their normal, opposed position on the bottom bracket. The easy way to measure is to pop off the left-side crank arm, and put it back onto the bottom bracket 180-degrees out of phase from its normal orientation, so it's mounted the same way as the right side crank arm. Then you snug it back down (don't overtighten or you'll trash the crank's mating surfaces), measure outer face to outer face, and voila! That's your Q.
In the past I've found that riding a bike with a relatively wide Q-factor hurts my knees. I can't really remember whether that was with or without clipless pedals, but I do remember the achy knees, and it was worrisome because I've already had one knee scoped, and would rather not go back again for that. The ache set in after only a couple of rides, too, as I recall -- not good. The ache resulted from installing a bottom bracket ordered online that turned out to be 10mm too wide. It was intended as a replacement for the BB on my Paramount, which was in touring/commuting guise at that point, but as it happens, the axle was a 128 or so, not the 118 I'd ordered. That's a big change, and it was really uncomfortable, so it came off, was replaced by a locally sourced and narrower part, and it went off to my parts box. Anyway, from that experience, I've tried to stick with cranks spaced somewhere in the neighborhood of the bike I have the most experience with, which is my Kestrel.
The Kestrel has 8-speed 105SC crank arms mounted on a 107 or 108mm Phil Wood bottom bracket, and it has a Q I measured the other day at about 152mm. However, I've only had that crankset on that bike for three seasons, and when I measured the Schwinn (which at the time wore the Kestrel's original 105SC 7-spd cranks and the same size BB spindle), it came in at 149mm. Finally, with its old-fashioned SR Apex crankset, the Motobecane measured out at 146mm. So 150 or so is the magic number for me, and I'm thinking a little under is better than a little over.
All of this measuring in mind, on Sunday, I pulled the bottom brackets out of both the Motobecane (Swiss-threaded cup and cone, 122mm) and Schwinn (English-threaded cartridge bearing, again at 107 or 108mm), cleaned out the bottom bracket shells on both bikes, sat down to work on the Motobecane.
 Months ago, I'd picked up new old-stock Shimano UN-72 bottom bracket (113), which is prized in the tinkerer community because the pressed-on cup can be tapped off pretty easily, and with that cup removed, the bottom bracket can be used with Phil Wood bottom bracket rings in a completely unsupported configuration. In addition to jewelry-quality bottom brackets and hubs, Phil Wood makes rings threaded for French and Swiss threading, so the Phil/Shimano combination is great for older bikes for which a $110 bottom bracket may be a little hard to justify.
As the scuttlebutt said they would, the Swiss rings mated to the Shimano bottom bracket like they were made for each other, and the bottom bracket installed quickly and painlessly. With the 105SC 7-speed cranks bolted up and the front derailleur travel adjusted to fit the rings, the Q measures 155mm. Which is on the wrong side of 150mm, but still narrow relative to many contemporary cranksets -- hmm. Let's hold onto that thought for a moment.
The Schwinn is still sitting there in the attic without a bottom bracket installed, and no crankset. I have upstairs that old 128mm bottom bracket, which simple math leads me to believe will result in a Q with the Apex cranks of around 152mm. Smack-dab on top of the Kestrel.
So what are my options? Well, I could just leave the Motobecane with a 155 spacing and see how it feels. 3mm isn't much, after all. Or, I could mix it up again. The Kestrel's Phil Wood bottom bracket would work just fine with the 105 7-speed cranks and Phil Swiss cups currently on the Motobecane, and should get the Q down to 150mm or just under. That would leave the bottom bracket shell of the Kestrel empty, but I have the 108mm Shimano UN-73 just taken from the Schwinn that would bolt in easily enough, and keep me at 152 or so on that bike. I'd rather have the expensive BB on the Kestrel, honestly, but there's nothing that says the Moto isn't deserving. If I did that (and I plan to), I'd have three bikes very close to 150, without having to spend any money.
I've been on the rollers pretty regularly since the holidays, and my left knee is starting to ache, which isn't good, considering the relatively low number of miles. Since my last cleat fitting, I've swapped the cranks and replaced the saddle a couple of times, so there are probably some variances at work, there, that can be rectified. I've got an appointment scheduled at Belmont WheelWorks next week for that, and I'm hopeful that'll help.
In the mean time I think I'll keep the swap going, getting the Kestrel apart and then back together, undoing and redoing the Motobecane, and finishing up the Schwinn.
All for now,
J
Parts Trays/Tool Trays

The next revision to my home made bicycle work stand.
These are a pair of 8" cake pans that had once served me well for making cakes and pot pies and stuff like that. But their non-stick coating was at some point along the way destroyed by using them to heat up egg rolls, pizza bagels -- stuff like that. Wasn't me, but here's a tip -- use ceramic Corning dishes for that kind of stuff, not nice, non-stick baking pans.
Back to the trays. So the pans got trashed, and then where the coating was removed, they rusted, so they weren't even suitable for heating bad food anymore. I'd tucked them away -- not sure why -- and then last week thought of them when considering the benefits of parts trays attached to my work stand.
These are heavy pans, and you can see that I potato-chipped them pretty good smashing in a small arc on their circumference to mate with the stand's support pole (I had no form to hammer them against). But that's really no concern -- we're not talking about cakes, we're talking about temporarily holding parts and tools while I work. Next, I drilled them on my press with one round and one oblong hole on either side of the smashed part, spaced to accept a U-bolt. The U-bolt was in turn sized to fit the stand's support pole. Installing them took mere minutes, and I settled on the angled-forward, roughly the same height layout you see here.
Easy, effective and proven handy already.
All for now,
J
Sunday, January 17, 2010
Winter Maintenance -- Part 1
 I'm sure that most people who tinker with their bikes would say the same thing, but winter is the season I use to do most of the maintenance on my bikes. That's not to say that I don't work on my bikes in the summertime -- I do. But I try to ride them more than work on them, then.
Now that I have a work stand, this year's onslaught of winter bicycle maintenance projects has begun. And I must say, they're much easier to manage with the stand -- particularly with the upgrades I've made since my last post.
 Last Sunday I added the 1x6 running diagonally across the base to stiffen it up, and I also shaved an eighth of an inch or so off of the two blocks' faces to narrow down and shallow out the grooves carved into them. The stand is more steady, with the extra rigidity in the base, and the clamp has an easier time grabbing hold of a seatpost -- it doesn't bottom out anymore.
So far, I've tackled one short list on Juli's Fuji and have just begun a set of planned updates that will start with the Motobecane, but touch on several of my bikes:
Juli's Fuji:
The one thing Juli and I didn't do to this bike when we were rebuilding it was to repack the headset. I made that executive decision both because it seemed to be turning just fine and also because I'd just redone the Schwinn's headset (first attempted without cages, and done without a work stand) and had been emotionally scarred by that effort -- at least as attempted. But it's been nagging at me, as I think I've said before, so this was at the top of the short list for the Fuji. The other biggie was to put a blinky on the back.
The headset came first. It's an old 105 SC headset, just like the one that came on the Kestrel (that one has since been replaced by an Ultegra unit). I pulled it apart on Friday night (yeah, I know -- my social calendar isn't very full these days), and cleaned the grease out of the cages and races. Everything looked good enough for a repack, rather than a replacement. Unfortunately, I didn't have any fresh ball bearings, so I reused the ones already in there. Not ideal, but it'll do for now.
As I'd been schlepping the bike up to the attic I noticed how heavy it was -- heavier than the Motobecane, and I'm not kidding about that. So while I had it up there, I took the Wald baskets off to lighten the bike up a bit. If the occasion calls for them, it's easy enough to reinstall them.
As for the light, I was hesitant to put the new blinky on the back of the Pletscher, because that's where the last one was when I crunched it standing the bike on its rear tire to pull the front wheel out. Instead, I used a stainless P-Clamp sourced from Velo-Orange to clamp the blinky mount to one of the rack's struts, and clipped it on there. It won't work with the baskets back on, but again, that's an easy remedy for the occasion.
While I had the bike in the stand, I greased the chain up (it was pretty dry), and in the process noticed that a bunch of the grease Juli and I packed into the rear hub had squeezed out around the left side dust cap. More importantly, I noticed that the hub feels tight. The rear is either a cheap Shimano hub or an even cheaper knock-off, where the front is a Campagnolo. The front spins silently pretty much forever, but the rear spins down quickly and loudly. So I'm going to have to take it off and check the lube and see what's up with the cone tension. One more job for the pre-spring list. Otherwise, it's ready for Juli's next season.
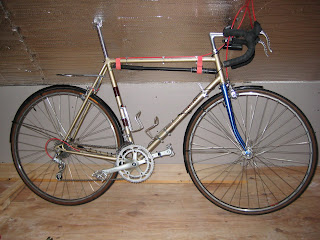
My Motobecane:
"Le Mongre" is clamped in the stand right now, as you can see, above. If I were to tell you what it needs, the list would be really short. Actually, it needs only a set of tires, because the Continentals on it are old and starting to fray a bit. But I've wanted to do a couple of things to it, both for aesthetic and functional reasons.
The seatpost is a little short (16cm), as I've written before. It hurts my knees to ride from the balls of my feet, even if the saddle is raised marginally past the seat post's Max mark, but riding from the arches is fine. Still, last fall I picked up a new seatpost. It's a 40cm post in 26.0mm, so it should have given me a safe margin of saddle height. Unfortunately, there's a problem.
 I noticed two things when I loosened the seatpost binder bolt, slipped out the seatpost and saddle, and slipped in the new one: First, the binder lug seemed to be a little bent, and second, the seatposts both moved pretty freely in and out of the seat tube -- more freely than I expected them to. Looking at the lug, it looks like it was deformed a little from overtightening, and you can see where the lug has bent the seat tube ever so slightly from being overtightened. Combined with the loose fit of the 26.0 seatpost, this suggests the current seatpost is undersized. So I'm going to look for a used Campy or Zeus or similar 26.2 post and see how that fits. Assuming it fits, I'll have a couple of 26.0 seatposts to put on eBay, along with a pile of other parts.
One other thing I'd wanted to do is to relocate the blinky mount. I'd like to put a larger saddlebag on it, so the seatpost mount wasn't ideal (a bigger bag would block it). And the fenders are plastic, not metal, so they're not rigid enough to support a blinky. So yesterday, I hung the blinky off the back of the Rivendell Hupe, again using a P-Clamp from V-O. It feels a little loose, so we'll see how it holds up -- might warrant a wrap or two of surgical tape. And while I'm on a paragraph including the word "fenders", I'm not really happy with how either of them sits on the bike. The rear sort of hunchbacks out, as is obvious in the photo above, and the front has a wierd sort of twist going on. Need to play with them some. For similarly cosmetic reasons, I also want to trim the front brake cable an inch or so to even out the loops coming out of the brake levers. And that leaves only one thing -- the big crank swap of 2010.
What's that? Well, I've been thinking about how I use my bikes. I do that a lot, actually. One of the most fun things about owning and tinkering with bikes for me is adapting them to suit my needs and to take a particular role in my fleet. I even blogged about this as I was building the Motobecane up a year ago, trying to imagine what I'd do with it. I ended up building it up as a sporty bike with wet-road capabilities, and the ability to carry a large saddlebag, and have genuinely enjoyed using it as an alternative to the Kestrel when the riding was wet or called for something less likely to egg me on than that bike.
At the same time, though, I've been enabling the bike for loaded or climbing duty by bolting on smaller chainrings (I've got a 36/48 combo for the 170mm Apex cranks, vs. the 42/52 it came with -- and for the sharp-eyed, that's the 52 on there right now), upping the tooth count on the freewheel cogs, and adding a long-cage derailleur to take up the chain slack with wide gearing. But the thing is, I don't ride it that way -- I just take it out on my loop when the Kestrel isn't the ideal ride. And with a year of riding it under my belt, I think it's pretty safe to say that I won't be. My 1972 Schwinn Sports Tourer is the bike I use for hauling around the trailer bike, or a bike trailer full of camping gear, or a loaded basket or rack -- not the mongrel Motobecane.
The Schwinn has a wide-ranging 6-speed freewheel on the back, but a 39/52 105 SC crankset in 172.5 up front. If any bike in my stable needs a compact crankset to help with climbing, it's this one, not the Moto. So my plan at the moment is to swap cranks between these two bikes. But because the cranks on these bikes are so differently shaped, I have some work to do to figure out the bottom bracket situation. More on this next time.
You'll notice, btw, that I've said nothig about the Columbia. It's still up in the attic awaiting its turn, leaning on the stand behind the Motobecane. I want to get the "real" bikes out of the way first, I suppose, before tackling this one. I think the Columbia will turn out to be a cool and fun ride, but I also expect it will offer a relatively narrow range of usefulness. So there's no rush to get it done.
All for now,
J
Saturday, January 9, 2010
Home Made Bicycle Work Stand

Probably like many bicycle tinkerers, I've made do for years without a bicycle work stand. I've worked on upside down bicycles, bicycles lying on the ground, upright bicycles leaning against a table, chair or wall, and the like.
I've always managed to somehow carry on, but the problems with this approach are numerous -- the bikes are unstable, they fall over, they get scratched on the floor, the saddles get trashed -- none of this fatal to either me or the bike, but also not really ideal. This was less of a concern when I was a kid beating the crap out of my bikes anyway, but since I began adding bikes I genuinely care about to my stable (most of which are equipped with saddles that don't fare well sitting upside-down on the ground) I've had at least a passing desire for a work stand. On the other hand, that desire was never so strong that I was willing to actually shell out the necessary cash for one.
Maybe a year and a half ago, I was surfing eBay and I found a work stand made out of a woodworking pipe clamp. I didn't want to spring for the Buy Now price ($75 or so, as I recall), but I thought it was one of the most innovative things I'd ever seen. I looked at the pictures and thought "I could make one of those easily enough". I already had a Pony clamp of the type used in the design, purchased mistakenly, thinking I was getting four of a different kind, not three and one. And the parts appeared to be pretty straightforward. At the time I imagined bolting the stand to the end of the western wall of my training stall, and foregoing the floor stand altogether. I even went so far as to buy a block of 2" square HDPE plastic (which is a different shape but I think the same material they make those opaque plastic cutting boards out of) from an eBay seller, with the intention of using it for the jaws. And when I moved to the apartment a couple of months later (Labor Day, 2008), I brought the Pony clamp with me, planning to build the stand, but I never got around to it.
Flash forward to New Year's day, 2010. That afternoon, I put a friend onto her plane back to Amsterdam, where she is living and working right now. On the way out of the departure terminal, heading back to the car, my girls and I stopped at a newsstand to pick up some chocolate and a Bicycling Magazine. As fate would have it, the January/February 2010 issue has an article in it showing how to build the very same hillbilly work stand with $30 of parts. There was nothing surprising in the article as I read it, but it spurred me into action. Today I spent $55 at Home Depot on materials (not including the Pony clamp, so their materials estimate is pretty optimistic), and I invested a couple of hours assembling the stand.
I looked online for the article so I could simply point at it and tell you to have at it, but I couldn't find it on the Bicycling website. I encourage you to go buy and read the magazine, but until then, here's what you need:
- A Pony type 50 clamp (made in the USA!)
- A 24" black steel pipe nipple -- 3/4" inner diameter
- A 60" length of black steel pipe -- 1" inner diameter
- A 3/4"-to-1" reducer elbow
- A floor flange for 1" inner diameter steel pipe
- A 2' square handy board of 1" plywood (I used 3/4 inch and it's too flexy)
- Four 5/16x1.5" carriage bolts with nuts and washers
- Eight #10x1" panhead screws
- A package of those 1" round felt furniture feet
- A 7" or greater block of 2"-square HDPE
The results are pretty self-explanatory. I used the mitre saw to cut off two 3.5" lengths of HDPE block. Then I ran the two resulting blocks through my table saw, to carve out a V-shape down the middle of one side of each block. I wasn't worried about precision, so as you can see below, the valleys are more like a W than a V, but they'll work just fine. The angle of the blade was 35 degrees or so. I should probably have cut the notches a little narrower and shallower to pinch a wider variety of seatposts, but if it bugs me I can always face one or both of them a bit on my table saw to achieve a tighter and shallower notch.

Next I enlarged the four holes on the pipe flange to accept 5/16" bolts, and drilled holes corresponding to the pipe flange holes in one corner of the sheet of plywood, then bolted the flange in place. The carriage bolt heads protrude just a bit from the plywood, so I stuck nine of the felt furniture feet onto the bottom of the plywood to keep the heads off the floor.

Then I drilled four 3/16" holes in each of the two clamp faces of the pony clamp, not worrying too much about precise placement. I'm not sure why, but the iron of the floor flange didn't drill easily at all, but the iron of Pony clamp drilled beautifully. Maybe they're cast of powdered metal or something.
I mounted the drilled Pony clamp to a pipe, next, and clamped the notched HDPE blocks into the jaws, after carefully lining them up, notch-facing-notch. Then I ran a pan-head screw into the blocks through each of the drilled holes to secure them. The notch will serve as a groove to hold a seatpost in the jaws of the Pony clamp. The Bicycling article suggests using a piece of 4x4, drilled and sawn lengthwise, but I suspect the HDPE will last forever without breaking apart, and that it would be less likely to mar a seatpost than a block of wood.

Finally, I assembled my components. The 1" pipe screwed into the flange on the base, the elbow screwed onto the 1" pipe, and the short pipe with the Pony still installed screwed into the open end of the elbow. Then I used the pipe wrench to tighten everything and orient the clamp into the desired position.
The nice thing about the Pony clamp design is that the spring loaded side can be quickly opened wide to accept a new bike, and slid closed with one hand to pinch the seatpost and suspend the bike. Then a few quick turns of the handle clamps the HDPE jaws down tight (not too tight!), to lock the bike securely into place. And as you can tell from the top picture of the stand holding my beloved Kestrel, it works!
As I mentioned, the base is a little thin, making the whole thing kind of springy, so I'm going to reinforce it -- maybe just mount a 1x6 diagonally across the top of base, and mount the flange to it, instead of to the plywood alone. In any case, it seems to work just fine, so after 35 years of riding and decades of fiddling, I finally have a work stand.
I've dragged the Columbia up to the attic, and tomorrow I'm planning to clamp it into the stand and begin tearing that old beast apart for its rebuild. It'll be fun to get my hands back on a bike after a few months away from tinkering.
All for now,
J
Related posts:
http://bronzegears.blogspot.com/2010/01/winter-maintenance-part-1.html (where I reinforced the base)
http://bronzegears.blogspot.com/2010/01/parts-traystool-trays.html (where I added parts trays to it)
Subscribe to:
Posts (Atom)

