Thursday, December 23, 2010

Holiday Break

This weekend and most of next week, I'll have my kids with me here at the house.  And as a special project with each of them, we're going to finish a major stage of each of their bike projects.

For Juli, that'll mean taking the derailleurs and control levers off the Fuji, mounting them on her Schwinn, cabling the bike up, installing a chain, and wrapping the bars.  If we have time, we'll move over the bell, trim the kickstand an inch or so to get the right lean, modify a Pletscher rack to fit this frame properly, and install the handlebar water bottle cage mount.  And with that, her 650B Schwinn conversion will be ready for a ride.  There's snow on the ground right now in Boston, but it may vanish before next week is up.  If so, she may get a test ride in before the new year begins!  I'll write up a summary of the conversion when it's done, including the couple of interesting-to-me challenges in building up this frame.

For Ava, the task is a little simpler -- to tear everything that's left on the Fuji off, and assemble a build kit in a box for next winter.  And also to get a spec sheet together for a frame builder to make a few modifications, as well as officially choose a color.  This last is sure to send Juli up in smoke, so I'm going to do that with Ava on a night she'll be at a sleepover party.  At the moment, I'm thinking like this:
  • Braze on a derailleur hanger on the right rear dropout, so I can ditch the adapter claws (which I needed on both sides to make the rear QR clamp properly)
  • Braze on a pair of water bottle cages on the down tube, so I can ditch the paint scratching clamps
  • Braze on a pair of cable stops on down tube, again so I can ditch a clamp-on stop
  • Braze on a piece of half-inch bar stock over the brake bridge to serve as a mounting point for the Pletscher rack, so I can ditch the clamps
You will notice a pattern on these last three.  If I'm going to get the bike repainted, I'd rather not clamp a bunch of stuff onto the fresh, expensive paint job and mess it all up.  I'd rather spend a bit more for proper bosses for all of these things.

Then the rest will be simple -- strip it to bare metal, pull off the head badge, degrease, paint the desired powder blue and reinstall the head badge.  This is all sure to cost way more than is sensible to spend, but that's OK -- she's my baby.  Ava, not the Fuji.

The build kit for that bike is pretty much all set, too.  I need to reclaim the Shogun from my friend who borrowed it, take the 105SC front and rear derailleurs off of it, pick up a pair of chainrings for a 160mm crankset I have, and voila!  C'est tout.  Oh, plus cables and eventually whatever color housing and bar tape Ava wants.  But that'll be it, for sure.  I've even picked up a kickstand for that bike, and will cut it short, to fit.

I'd like to put 40 miles on the rollers this weekend, too -- we'll see how I do with that goal.

Happy holidays everyone.  And here's hoping for a healthy, happy and prosperous 2011!

All for now,

J

Wednesday, December 22, 2010

Defeat

Defeat is temporary -- or it isn't.  Apart from mortal combat situations, which way this swings really depends on how you respond to defeat.

Defeat -- loss by another word -- can be awful.  It can tear at your soul, your self-esteem, and your heart.  And if you've been hit by loss after loss, it can be hard to keep perspective, or know when the free-fall will stop.  But the bottom will come if you let it -- if you let each defeat weigh upon you only temporarily.  If you study each to figure out what went wrong.  If you learn a new rule each time, or what to do next time.  Or not do.

Or you can cling to each defeat as an emblem of your failure, and make it part of yourself.  You can take that path.  But if you do, the free-fall will be longer, and the losses will keep coming -- possibly until you have nothing left to lose.

Better to take from each loss what you can, then let it go.  And ultimately easier.

All for now,

J

Tuesday, December 21, 2010

Forward

I'm adding no new wisdom to the world by delcaring it here, but there's really no going back, in life -- only forward.

Back is a tempting place.  Back was known.  It may have been safe.  But trust me, it's gone, and can't be recaptured.  The important questions don't relate to how to get back to something that was, but rather how to go forward.  What to forge -- what new reality to create?  With whom?  And when?

Scary stuff, going forward -- lots of unknowns.  But standing still isn't living, and there's no going back.

You knew all that.  But sometimes I forget.

All for now,

J

Sunday, December 5, 2010

How much is this hobby costing me?

I was just reading the comments on one of Velouria's recent posts over at Lovely Bicycle. The topic was budget bicycles and whether it's better to buy something cheap or something used.  That got me thinking about my bike projects and how much they've cost me, and honestly, those are numbers that are best not thought about.  I probably have $1500 into my Schwinn's build, for example, and it's worth maybe $500 on eBay, if I'm lucky.  The Motobecane was a gift from my friend Steven, but I've probably got $500 into that in components and accessories.  Probably more.

Then there are the girls' bikes.  Juli had three bar/stem/lever setups on her Fuji in the two seasons she rode it.  Two of these required new parts, each to the tune of $150 or so.  Then the bike itself cost $300 or so, shipped, and there are cages and the rack and the saddle bag and her Brooks saddle to consider, not to mention the upgraded front derailleur, brakes, tires and tubes, cables and housing, and the cranks and pedals.  $1000 all-in wouldn't surprise me.  Two seasons!  Now, it's true that Ava will be on that bike for a couple of seasons, herself (maybe even 3), but it's going to cost me $5-600 to get it ready for her, once I'm done cannibalizing it for Juli's Schwinn, and getting it repainted.

Then there's Juli's Schwinn.  The frame was cheap, and the fork was, too -- $200 total, I think, with shipping.  The cranks, derailleurs, shifters and brakes were all on-hand or cannibalized from the Fuji.  The headset, stem and bars were new for this build -- that's $100 or so.  The wheelset cost me $200 for the parts and $250 for the class!  And I've got another $300 in miscellaneous components in there, too -- 650B tires and tubes, kickstand, cable stops, hangers, the brake pulley thingy, etc...  I'm guesstimating here, but that one is quickly inching towards a thou as well, even without the wheelbuilding class costs factored in.

On the other hand, I'm not exactly cutting corners on any of these bikes.  My taste in components and accessories tends towards the expensive, and I always seem to end up paying way more on eBay than I can sell the same parts for when I move onto something new.  And the only money I spent on my Schwinn this year was for a new wheelset (crash) and the fenders and saddle bag I bought for my trip to Italy.  So apart from the crash and two purchases for a specific purpose, I pretty much just rode it.  All it needs right now is a replacement big ring, to replace the one ovaled by baggage handlers.  Likewise, the Motobecane got a little spend early this season, as I sorted it out for its intended role, but very little over the summer (bar tape).  It shouldn't need anything to get me through next season -- maybe tires, depending on how much the rollers chew those up this winter.

Anyway, I guess the answer is that as hobbies go, this one hasn't been particularly inexpensive for me, and that most of that spend is impulsive on my part -- discretionary, not mandatory.  I think one of my New Year's resolutions will be to spend no more than $100 each on the Schwinn and Motobecane in 2011.  I'm sure it's possible -- the question is whether I have the discipline to stick to it.

Juli's Schwinn is looking more and more like a bicycle, by the way.  I'll write more another time, but it has wheels and tires installed, and is awaiting transplant of the drivetrain and control levers.  This is good fodder for the coming Christmas school vacation.  Then we can cable and tape it, and it'll be roadworthy, and ready for a test ride and its final accessories!

All for now,

J

Saturday, November 20, 2010

650B Schwinn Build, Day 1

This is a weekend I normally wouldn't have had the girls. But Ava had a play date today, so their mother asked me to take Juli for a few hours. Yay! In addition to doing a few chores, we spent about an hour on Juli's Schwinn, taking off the parts I'd test-fit, washing and waxing the frame and fork, and starting the bike's build, for real.  We have a long way to go, as you can see, and the process will likely be broken into several sessions, but the build should go quickly.

In anticipation of this, I'd moved my bike stand back up into the attic, along with my bike tools, the Schwinn itself, and Juli's old Fuji, which will serve as a donor bike.  What doesn't get donated to the Schwinn from that bike will come off and go into a box, so that I can ultimately send that frameset out for a strip and repaint on Ava's behalf before its next build-up.  If I'm completely off my rocker when the time comes, I may also get shift cable stops and a pair of bottle cage braze-ons installed in the process.

The big thing worth mentioning about the build so far is the headset, whose final state you can see here.  As I mentioned last time, we're using a threadless headset with a top nut from a threaded headset, a NOS Suntour locknut to keep the top nut in place, a stack of 1" headset spacers, a 1" threadless cable hanger, and a Nitto 50mm quill stem.  The steerer tube is long, and it has only a couple of inches of threading.  On this frame that's not enough to allow the use of a threaded headset, and too much to allow for a threadless headset, cable hanger and stem, if the threaded part were hacked off.  So this mash-up was cobbled together, and it seems to be working just fine, in that the fork turns and nothing seems to be doing anything untoward.  I'll let you know how it holds up in service.  We did rearrange the stacked parts, relative to the test-fit, to get the stop a little lower than it was.  The handlebars are old French bars -- nice and compact for their intended user.  One thing I noticed is that the handlebar collides with the top tube at full lock.  The bike will have bar-end shifters, but I might twine and shellack that spot on the top tube, both to protect it and to cover the blighted paint that's in that spot today (apparently this isn't new to the current bar and stem combo).

The brake calipers are in place, sans pads or cables, and when we finish the rest of the brake installation, I'll share more about the two unorthodox features of the brake setup.  We're using Dia-Compe centerpulls (610 and 750 reach, front and rear) with the hope that they work better for Juli (who'll probably weigh no more than 110 lbs during this bike's service to her) than they did for me on my Schwinn.  If they still suck, we'll find another solution.

The Greenfield kickstand is bolted into place, and I'm hoping the frame's kickstand plate will keep it from moving around down there (I remember these things drifting around when I was a kid). I might also twine and shellack the kickstand arm to protect the crankset. Might. We'll almost certainly have to trim and file that arm once we have tubes and tires installed on the wheels, to get the right lean.

Speaking of tires, once the bike is on its rolling stock, we can level the saddle and handlebar, and also figure out how much to trim the Pletscher struts so the rack sits level to the ground when installed on this little frame.  I suppose we could do that without tires, too, but I don't like setting a bike on the ground on bare rims.
We installed the crankset, which is the same one that served Juli well on the Fuji, as well as the saddle and one bottle cage from that bike. The crankset is a 165mm Bontrager part with compact rings (36/50 iirc), and it mates to a Truvativ ISIS bottom bracket. The saddle is a Brooks B17, in honey.  And the bottle cage is just a Specialized cheapie.  Other components and accessories will make their way over from the Fuji in later sessions, including the rest of the drivetrain, the control levers, another cage on an auxiliary mount, a bell, a saddle bag and a blinky.

I also ordered most of the last of what we'll need, today.  During the work we did today, I noticed a few more things we'll have to install, but even so, the list is short:  tires & tubes, a cable stop for the seat tube, brake pads, a pair of barrel adjusters, a chain, and a plastic cable guide for under the bottom bracket.  I couldn't get that last part from Rivendell, so I'm going to hit my LBS for that sometime in the next week or so.  The rest should be here after Thanskgiving.

Anyway, Juli seemed to have fun, and she seems fully over the pinkness of it all, now that the bike is coming together.  She greased the headset races, installed the rear brake and water bottle cage, washed the frame, and seemed enjoy stroking the freshly waxed paint and chrome.  Don't we all, though?

All for now,

J

Sunday, November 14, 2010

Juli's Pink Schwinn Taking Shape


I received some parts this week intended for Juli's next bike, so I spent a few minutes today trying out my bastardized headset idea, and then test fitting some parts.  As you can see, the pink Schwinn frame is starting to look like a bike!

Currently on the bike are a Dia-Compe 610/750 brake combination, a pulley for the rear brake cable (which on this frame will approach the seatpost clamp area from below, not above -- I'll detail this when I write up the build another time), a Greenfield (made in USA!) kickstand, a Shimano 12-28 7-speed freewheel, the 650B wheelset I built up in class, a seatpost, stem, handlebar, and the aforementioned headset.

The day after Thanksgiving, Juli and I will start the build process in earnest, beginning by taking everything you see off the frame, and giving it a good scrubbing and polishing.  After that, it should go together pretty quickly.  We have most of the parts we need (beyond what's listed above), save for tires & tubes, fresh brake pads and control cables.  Blue handlebar tape and cable housing are sitting in a box out in the barn, along with a Pletscher rack that I'll modify to sit level on this little frame (as I did for the Fuji, by shortening the support struts).  The drivetrain, control levers and saddle will be scavenged from Juliana's Fuji, along with key accessories, like the bottle cages, blinky and saddle bag.

As for the hybrid headset, it seems pretty sound to me.  The headset is threadless, but the steerer tube is threaded.  There is a locknut near the top of the spacer stack, and the threaded top-nut, as you can see.  For the test fit, I put a spacer between the lock nut and top nut, but in the final build I may move that under the locknut, and play with the order of spacers and hanger in the stack, to get the cable hanger as low as possible.

The girls' mother stopped by with the girls today to pick something up, just as I got to the stage you see, here.  Juli was all smiles, seeing her new bike, and offered the verdict that the dreaded raspberry-pink frame is overshadowed by all the shiny metal, making it acceptable.  As long as the cables and bar tape are blue, that is.  We'll see how long that position lasts!

It should come together quickly, from here, and be ready for Juli to use as soon as the weather warms up enough for riding, next Spring.

All for now,

J

Friday, November 12, 2010

Huret Dropout Adapter

Here's my first pass at an engineering drawing for the adapter I made for my 1972 Schwinn Sports Tourer.  This simple little part installs on the derailleur mounting/pivot bolt, and sits squeezed in between the derailleur and the dropout.  Its purpose is to fix an incompatibility between modern derailleurs and an old Huret dropout.  The Huret dropout has the derailleur adjustment screw flat maybe 30 degrees farther forward than does a modern dropout, and the adjustment screw on a modern derailleur won't connect with the flat at all.  This adapter provides a new flat in the right place for a modern derailleur.

All dimensions are in mm.  Start by taking a little scrap of 1-1.5 mm sheet metal (I used chrome plated brass that started life as some sort of washer), and cutting it like so:


If you could get it to scale right, it would be great to be able to print this image on a laminating sheet and just stick it onto your sheet metal as a template.  I'll see if I can figure out a way to post a file that's 1:1 scale.

Anyway, once you have the thing cut out, file the edges smooth so you don't cut yourself.  I'd even round off those pointy tab corners a bit.  If you use brass like I did, filing takes no time at all.  Then drill a 10 mm hole up at the top, there, and file its edges too.  The hole is oversized to accommodate adjustment.

Then the next step will be to fold the part on the three lines toward the bottom (sorry, I couldn't figure out how to dash the lines) using a pair of needle-nose pliers.  The two tabs at either side fold towards you about 110 degrees or so -- past vertical anyway (you'll need to fiddle the correct angle during installation, so don't sweat that too much).  Then the rectangular flap with the (now folded) tabs folds up 90 degrees so that the tabs now sit along the body.  The tabs' angle should be about radial to the hole.  The little box section formed by the three folds is installed facing away from you, fitting up against the dropout's adjustment flat.

The drawing is nothing fancy, yet.  But I'm used to freehand graphics packages, not tools that expect accurate measurements.  Next up, I want to make the drawing 3D, and figure out how to fold it in the software to give a preview of the finished part.  And I'll take a picture of the installed prototype adapter so you can see how it fits.

Should be fun!

All for now,

J

Sunday, November 7, 2010

New Projects, New Work

I started working again a couple of weeks ago at a company that makes CAD software.  I'm doing Product Management work, as I have for a long time, and so far it feels like it'll be a great place to be.

I'm not managing a CAD product, but rather a cool new social app that they're building.  Even so, knowing the core products is always important, and I've got a few things in mind that I want to do to get up to speed -- starting by creating a schematic for the adapter shim I made for the Huret dropout on my 1972 Schwinn Sports Tourer, to allow it to support modern derailleurs.

The goal is simple -- take the adapter off the bike (now that it's likely down for the winter anyway), measure its key dimensions and get them into a blueprint.  Mostly I want to learn the products, but I'll also have something of value at the end.  Probably only enough value to share freely rather than do something commercial with, but even so, something of value to fellow tinkerers.

It should be a fun project, and I'm hoping to get it done this week.  I'll let you know how I fare.  After that, I have a front rack I'd like to design -- a sort of variant on the one I bought over the summer that didn't work with the fork or brakes on the Motobecane.

In the mean time, I've ordered the headset spacers and cable hanger needed to try out the unusual headset build I wrote about last time.  And the next step for the build is to take the frame into the basement with a bucket of water, some rags and some simple green for a thorough cleaning.  It's a little chilly to do it outside, now, but I want it clean and waxed before Juli and I get the build rolling this winter.

All for now,

J

Thursday, October 21, 2010

Unconventional Headset Build

I recently picked up a chrome Klein 700C fork for Juliana's to-be 650B Schwinn, both to reduce the pink factor and to make the front brake reach situation a little more manageable than with the bike's original fork, which had very long legs (designed, as it was, for 27" wheels).  Something I didn't really anticipate is that this fork would create some complications from a headset perspective.

I was surprised to find that the steerer tube of the fork is fully chromed.  And on this fork, the threads stop about an inch and a half short of where they need to be for Juli's frame.  I think if I took the fork to a bike shop that has the tools needed to thread the fork down, they'd refuse to do it because the chrome plating would be hard on the threading die.  Also, the unthreaded length of the steerer is a little too short to support both a brake cable hanger (which I need because I'm going to install centerpull brakes on the bike) and a threadless stem, without having to clamp the stem onto a partly threaded area, which seems like a really bad idea.  And I've found it difficult to find 1" threadless stems with a short reach appropriate to a 10 year-old.  I have a nice Nitto quill stem with a short reach, though.

So, I probably can't thread the fork to work with this frame with a threaded headset, and I probably can't safely use it with a threadless stem.  What to do?  Well, here's what I'm going to try:
  1. Get a threadless headset (done)
  2. Get a threaded headset (also done)
  3. Find a brake cable stop/hanger that will clamp to the steerer tube (found, but not purchased yet)
  4. Buy a bunch of 1" headset spacers (not done yet)
  5. Buy a locknut for a 1" threaded headset (done -- NOS Suntour part)
  6. Install the threadless headset, spacers and cable stop, getting the spacer stack up into the threaded zone of the steerer
  7. And finally, the theoretical part:  Instead of using a star-fangled nut, top cap & bolt, spacer stack and stem to tighten the headset, I'll use the spacer stack, hanger, and the locknut and top nut on the existing threads. 
With the open steerer top, I will be able to use the Nitto quill stem I have, as normal.

Has anyone else tried this?  It's unconventional, and I haven't seen any postings on the web where someone has bastardized a headset this way, but I don't see any reason it wouldn't work, and work safely.  Just as with a threaded headset, there will be two threaded nuts tensioning the bearings and locked against each other -- the only difference is where the spacers will fall.  And just as with a threadless headset, I'll have spacers playing a role in tensioning the bearings.  Yeah, I'm pretty sure it'll work just fine.

Guess I'll find out!  If it doesn't, I'll have to go get a new fork, I guess, and flip this one back on eBay.  I don't think I'll end up wrecking any parts in the process, and if I can't use that configuration, I'll be able to reuse one of the headsets with a new fork.  I'll snap some pics and follow-up when I find out if it works.

All for now,

J

Tuesday, October 19, 2010

Juli's Wheels -- Finished!

Just a short, final post about my wheelbuilding experience today.

Monday night was the final wheelbuilding class at Broadway Bicycle School.  The process was largely the same for the front wheel as I described for the rear wheel a couple of weeks ago -- a gradual and repetitive process of tightening spokes for tension, dish and true.  Once again, it was neither hard nor frustrating, but rather an engaging and deliberate process.  It would probably have been harder solo, though -- it was great to have Dave there as an expert resource to provide guidance.

The wheels look great -- nice and shiny -- and they should serve Juli well on her Schwinn frame.  I picked up rim tape and a 7-speed Shimano freewheel last night, as well, and need to buy some tubes and relatively narrow (32mm or so) 650B tires before the wheelset is complete.  The only mechanical work left on the wheels is to carefully lift the seals on the hubs' cartridge bearings and make sure they have enough fresh grease.  And I think the only other parts I need to start the Schwinn's build at this point are cables and housing (blue) and a stubby 1" threadless stem.

Tallying up the bill for the parts and the class, it's clear this wasn't a way to save money -- I could order a set of wheels from Velo-Orange for less than I spent on this experience.  But this really was never a scheme for saving money, as I doubt that my personal lifetime need for new bicycle wheels would offset the cost of tools alone needed to repeat this process on my own.  This has really been about the experience, about doing something that most people, even avid cyclists, will never do.  And what a great experience!  I understand a great deal more about the hoops that hold us up, and should be well-armed for keeping the wheels for which I am caretaker spinning true.

Having recently spent some time working on his bike (which I apparently made look easy), a friend of mine suggested last night that I find a part-time job working at a bike shop.  Just a few hours here and there working in the service area for fun, he said.  I do love working on bikes, and I think I largely know what I'm doing.  And earning a little cash to feed my bike part habit would be useful.  But it wouldn't be about money, and I'm not sure that's really the right forum for exercising this hobby.  Maybe volunteering for a local earn-a-bike program or Bikes Not Bombs or something.

I've got Juli's bike to build up this winter, of course, and what will become Ava's Fuji to tear down.  But my own bikes are far fewer in number this year than they've been, and neither of them really needs more than a few minutes of work during the coming off-season.  I'm going to run out of bike projects early, and it would be good to find another outlet.  Anyone have any other ideas?

All for now,

J

Sunday, October 17, 2010

Pedal Rebuild

The Motobecane came to me with a nice old set of MKS pedals.  I got that bike about 18 months ago, and rebuilt the pedals shortly after it arrived.  They were installed on the Motobecane last year, and on the Schwinn this year.  I know I put just over 300 miles on them this year, maybe 30 of that in rain.  And I am guessing they had 200 miles or so logged last season.  So they haven't seen a lot of use, in other words.

On Thursday, I took the Schwinn to the grocery store for a quick bit of shopping.  While parking the bike, for some reason I reached down and turned the left pedal by hand, and was surprised to find that it was in need of another rebuild -- gritty and coarse in its movement.

So Friday morning, I pulled the pedal off the bike and brought it inside to take it apart.  It's a simple job, rebuilding pedals designed for it, and it took all of 3 minutes to unscrew the dust cap, loosen the locknut and then back off the outer cone with a screwdriver (the cones are slotted, not shaped for a wrench).

What I found inside was interesting.  First, the teflon grease smelled strongly of chemicals, where it barely smelled at all when I put it in.  I don't have any idea if this matters or not, but it seemed a little runnier (still grease, though, not oil) and was definitely stinkier.  Second, the outer bearings (the ones under the dust cap) were still turning in grease that looked clean, but grease in the inner bearings was black.

The bodies of these old pedals have a black plastic insert that appears to serve as a seal against the pedal axle.  I'm guessing that the blackness in the grease is a combination of contaminants, including some measure of plastic abraded away from this insert.  There are a couple of things that could cause such abrasion.  First, physical contact with the axle, which might have happened if I adjusted the outer cone too loosely, and the pedal body was able to move around under the load of pedaling, and actually contact the axle.  And second, grime making its way into the small crack between the axle and plastic seal could have become an effective abrasive.  Pulling the second pedal off and opening it up revealed much the same thing, but not quite as far along.

There's really not much to be done about grit -- it's out there, it's on the road, and all you can really do is clean it out when it gets to be too much.  But as for the bearing tension, I recalled what my instructor at Broadway Bicycle School had said -- to snug down the locknuts to make the bearings on a freshly packed hub feel a bit too tight, with the confidence that they'd loosen up a bit with use.  My last repack was done prior to this advice, so it's entirely possible I went a bit too easy on the adjustment.  So this time, after replacing the grease and 11 bearings per side, per pedal, I tighened the outer cone a bit more than I normally would have, and snugged the locknut down on a bearing which doesn't feel as loose as it ought to.

I've got a few more rides coming this fall, and I'll try to use the Schwinn as much as I can, to exercise the pedals and get them settled in.  I took it out today with the girls, where I followed Ava around on her little Gary Fisher mountain bike, iPhone in hand, snapping photos.  That's probably not smart, but it was still fun.  The pedals felt fine underfoot, not calling attention to themselves, and so Ava's increasing confidence got all of my attention.

With any luck this rebuild will last more than 500 miles or a couple of seasons.  If not, I suppose I won't feel too badly about retiring a pair of 35 year-old pedals.

All for now,

J

Wednesday, October 13, 2010

Great Season

Fall is truly in the air this week, and my rides today and yesterday called for long sleeves.  Actually, that's true of my past 4-5 rides, now that I think about it -- temps are back around where they were in April and May, when I started riding outdoors again.

I took the picture above on Saturday morning, wearing a long-sleeved tee over another tee.  It was taken in Somerset, NJ or thereabouts, on a canal path.  It was a beautiful early-fall morning, with mist on the canal and the cool water doing its best to keep the sun's warmth in check.  The ride was easy; flat and only 11 miles -- time spent with a college buddy, as much as anything.  And once again I appreciated the versatility of the Schwinn, which carried me over packed rock dust, drying mud, dirt and sand without complaint and with nary a wobble.  There was only one portage required -- fifty yards across a mossy flagstone spillway, where the canal wall is lower, apparently designed to allow high water out.  The Paramount could have made it across, but the Schwinn isn't laid out for that kind of work.

The cycling season that's now winding down has been terrific.  I've logged over 1500 miles, split about 600 each on the Kestrel and Motobecane (the Motobecane now slightly ahead of the now-retired Kestrel), with over 300 going to the Schwinn, which I mostly used for errands or riding with my kids.  I'm working with odometer readings, not logs, so I can't say for sure how many of the Schwinn's miles were logged with the girls, but I'm going to guess it's somewhere around 125.

I might fit another 100 miles in, here and there, before I bring my season inside to the relative monotony of my training rollers, but I don't expect to hit 2000 outdoor miles. Still, 1600-odd miles is a pretty big number, facilitated in this case by a dry summer and not working.  It looks like that may be drawing to a close as well, which is good -- I'm ready to be back, fully recharged and ready to go.

Cycling no doubt contributed to that recharge.  I'm in better shape, physically, than I've been since high school, if ever.  My weight is good and I'm really strong -- at least for me.  With every pedal stroke and every mile logged, I've had time to process -- to think through where I've been the past few years, what I've learned, and the direction I want to head.  I have lots of perspective, some reasonable conclusions that should serve me well, and I feel great about the possibilities ahead of me, both personally and professionally.

1500 miles and a stronger body, mind and heart.  What a great season.

All for now,

J

Thursday, October 7, 2010

Juliana's Wheels -- Rear Complete

You know, building wheels isn't really all that hard.  Time consuming, yes.  Made a lot easier with the right tools and an expert on hand to help, yes.  But it's not hard work or tedious work, and I'm really enjoying the process.

I finished Juliana's rear wheel in class, Monday night.  It took about two hours to get it from laced to fully tensioned and true, in a very iterative process with lots of repetition both of steps and groups of steps.  Essentially, what all of those steps achieved was to shorten the effective length of each spoke wire, tensioning it between the rim and the hub, and centering the rim between the outer locknuts of the hub's axle.  That all sounds complicated, but the mechanics are really pretty simple, as are the steps involved.

The first step of the night was to tighten the nipples down so that the last thread on each spoke end was just barely covered up by the nipple.  This basically just tee'd each spoke up with a more or less uniform starting point.  From there, we added two full turns to each nipple, to snug them down just a bit more and again, keep them more or less uniform.

Next up, Dave asked us to use the closed end of a wrench to pry the spoke ends just a bit so that they sat nice and flush up against the hub body, rather than curving out a bit.  Then came another round or two of tightening, working the spokes on each side separately (since this is a rear wheel, with an asymmetric hub and different spoke lengths per side) and then squeezing pairs of spokes together to relieve the torsional wind-up that is introduced by tightening them.  What I mean by that is that as the spoke nipples are turned to tighten the spoke, friction forces some of that twist go go into rotating the relatively flexible wire of the spoke, rather than into pulling it tighter, the result being that the spoke is then carrying an undesired torsional load in the form of that twist.  Giving pairs of adjacent spokes a good squeeze together releases the stuck parts, letting the spokes un-twist.

After a couple of rounds, the wheel was tight enough to start thinking about making it true.  Actually, it was surprising just how out of true the wheel was, given that I was trying to keep everything pretty uniform as I went.  But it was pretty far off, and that first truing took a long time to get right.  And I didn't just have to make sure the wheel wasn't wobbly at the sidewalls, I also had to make sure the wheel was circular, with the axle centered in that circle.  That's the truing stand that the wheel is in, at top, and the little pinchy thing towards the front (partially cut off at the bottom) is an adjustable guide that provides a steady reference point to true against.  As the wheel rim is spun, it's easy to see it wobble, and then the guide is adjusted so that it just barely grazes the rim at a "high" spot on one side or the other.  Tightening one or two spokes will usually take care of that high spot by pulling the rim slightly towards the left or the right (depending on whether the spokes came from the left or right side of the hub), and then the process is repeated until there are no more high spots on the rim.

I think there were a couple of rounds of tightening and truing before the next step, but honestly it all sort of became a blur in there at some point.  Either way, we eventually got to the point where we needed to make sure that the rim was centered between the outer locknuts on the axle.  In normal circumstances, an uncentered rim isn't going to ride right.  The rim won't be centered in the notch of the fork or chainstays/seatstays, for one, which means the tires might not clear and the brakes won't grab properly.  It's easy to measure this with a dishing tool, which doesn't actually take measurements or anything -- it simply adjusts to mark the distance from the rim to the outer locknut, and then you flip the wheel over and fit the tool against that side to make sure that distance is the same.  If it is, the wheel is properly dished, and if not, the spokes on one side or the other will need to be tightened uniformly, to pull the rim this way or that.  Then true again, check the dish again, adjust again, true again, check the dish again, etc...

Once the dish is right and the wheel is true, it's time to check for uniform (give or take) spoke tension across each side of the wheel.  Park makes a gauge that makes this easy.  Essentially you clamp it in turn to each spoke and the clamping action tests how much it can bend the spoke.  If the spoke bends more, it's more slack, and if it bends less, it's more tight.  The objective is to have all of the spokes sit in a range of tension so that the wheel is neither too loose and flexible, nor so tight that it becomes overstressed and prone to breakage.  It turned out I had everything a little loose, so I had to tighten everything up a bit more, then check the true, check for uniformity again, adjust, true, check and repeat.

The last step was to plop the wheel on its side on a stool with a divot worn into its seat, and apply lateral pressure to the rim, then flip it over and do it again from the other side.  As with squeezing pairs of spokes, this is intended to relieve any lateral stress on the spokes that was introduced during the build.  Then check the dish, make sure it's true, adjust, recheck and repeat.

At the end of all of that tightening, checking and truing, I ended up with a rear wheel that seems like it'll do the job.  Juli certainly seems pleased, and I'm just thrilled that I was able to do it.  In two weeks, I'll have the last class, and I'll take a crack at the front.

I have one concern, looking very closely at the rear rim:  I didn't notice it before building the wheel, but it looks like these rims have the slightest amount of stagger to the rims' spoke holes, where the holes are slightly offset alternately to the left and right.  If that's true, I got lucky with respect to lacing up the correct side of the rear wheel with the correct holes in the rim.  But since I wasn't deliberate about that mapping (I didn't notice the staggered holes before, if they are truly staggered), I may not have been so lucky with the front wheel -- have to see.  I'm not sure I'll be able to re-lace the front wheel and tension it in one class window, but if need be, I'll give it a shot.

Anyway, so far, so good.  I'm still having fun, and part of me (the part that loves toys) is thinking about wheel truing stands, spoke tension gauges and a dishing tool so that I can build my own wheels whenever I please.  Probably best to ignore that impulse right now, though.

All for now,

J

Monday, October 4, 2010

Gran Prix of Gloucester Cyclocross, 2010


For all of my enthusiasm about bikes and cycling, I've never really been into bicycle racing.  I enjoy riding too much to take the fun out of it by competing seriously, and I know I'm not talented, young or strong enough to be particularly good at racing at this point, anyway.  And apart from a stint over a decade ago where I watched open-wheel racing pretty regularly, I've never been sucked into regular TV spectatorship of any sports.  TV is great for amplifying the action and talent, but for me the fun of a sporting event is tied tightly to the experience of being there.  So as for bike racing, I don't do it, I don't necessarily understand the tactics of it, and I don't really watch it on TV (the TdF or otherwise).

But I don't dislike it or anything, and going to see the TdF is on my bucket list somewhere after going to see the 24 hours of LeMans. So when I heard about the Gran Prix of Gloucester, one of the bigger cyclocross events in the US, hear tell, I had to check it out.

I don't know a lot about cyclocross, and won't pretend to, but the jist of it is road-ish types of bikes being raced on a broad variety of terrain, from pavement to grass, dirt and mud.  The races (at least these races) are timed events, not distance events.  They ran for an hour, or about the length of one of my typical workout rides.  But riding competitively, over grass and dirt and what-have-you for an hour is an entirely different animal than going out for a workout ride on the road, of course -- far more intense.  I have a hard time imagining that, honestly.

The bikes sit somewhere between road and old-school mountain bikes.  Their frames look like road racing bikes in terms of their geometry and overall shape, and they run 700c wheels and drop bars like racing bikes.  But they're also generally equipped with cantilever brakes (to keep the tire clearance nice and open, vs. caliper brakes), lower gearing for hill climbing, additional brake levers on the bar tops, and knobby (if narrow) tires.  The riders' posture in the saddle is very much like a road riding posture, and it looked to me as if they use the saddle most of the time, rather than spending the race standing up and using body english like on a mountian bike.

Just to dwell on the hardware a bit more, it was cyclocross bikes that got me thinking differently about cycling a few years ago.  Way back in the day, my early ten-speed bikes were generalists, and I rode them anywhere I could on lightly treaded road tires.  Not sand, so much, but dirt, grass and even snow sometimes.  Then over time, my road bike purchases became more and more specialized in favor of road use, to the point where my recently retired Kestrel could be really twitchy, and seemed to want only to crash on gravel, grass or other unpaved surfaces.  Some of this was undoubtedly the narrow and high-pressure tires I was running on the Kestrel and Shogun before it, but I'm sure it had to do with the bikes and their geometry, as well.

But a cross bike?  Gosh, they look a lot like road bikes, and just look at the terrain they're piloted over.  Seeing them years back started me thinking about more rational road bikes, and that ultimately led me to a couple of projects rebuilding vintage road frames into all-around bikes.  My Schwinn Sports Tourer wears lightly treaded Panaracer Pasela tires, and can be ridden on dirt paths, grassy trails and other uneven surfaces without fear of crashing.  It's not as fast as my Kestrel was, but I can ride it most anywhere I want. And while my Motobecane Grand Touring (also shod with Paselas) is a little sketchier than the Schwinn, it too is a far better ally off-pavement than the Kestrel was, without being meaningfully slower than that bike.  I think it's fair to say that I have a restored appreciation for cycling versatility, thanks indirectly to cyclocross.

This was my first time at a cyclocross event, and really, I just dipped my toe in.  I had the girls, and they were more interested in the beach and the playground than the racing.  And I had my dog, who can be a handful around other dogs while on-leash, which makes it hard to bring him places.  We watched most of one race, and then walked around the vendor tents that had been set up for a bit, seeing what was there.  We saw and waved to my wheel-building instructor, Dave, at the Pedro's tent (he races with Pedro's sponsorship), but he looked busy and we didn't bug him (he told me in class later that he'd placed in the 30's of some 90 riders -- pretty good!)  Then, after a bit, we watched the first few laps of the elite womens' race, before starting to make our way along the course and back to the car.  Next time I won't bring the dog, I'll bring a picnic, and maybe invite some friends who'll appreciate the event more than my kids did (no slam on the kids or the dog, there).  It was fun, though, and interesting -- and most importantly, I know what to do differently next time.
All for now,

J

Friday, October 1, 2010

Cat pee, Nike? Seriously?

A non-bike post today.

So, for the record, most of the sneakers I've owned have been Nikes, and one of my current pairs is from Nike. And I like them! I like their innovation, with the Apple tie-ins, etc.

In the past, I've bought a mix of Nikes and Adidas and who knows what for my girls for Soccer, and Juli's current cleats are Nike. Or were, I should say. I bought these in I think March or so. They're series 90 or something like that -- have a couple of big 90's on them, in any case. And oh my God do they stink like cat pee!

Now, I don't have a cat, and the shoes weren't left somewhere someone else's cat could pay them a visit. And they didn't start out smelling like that. No, according to what I found online, these shoes start to smell that way when they get wet. And of course in New England, kids practice and play soccer on wet fields. And of course if one day you notice that your kid's cleats smell like cat pee, the first thing you do is what? That's right, you wash them, and then let them dry in the sun. Only in this case, washing them just makes it worse because then the shoes are well and truly soaked, and whatever it is about the materials in the shoes that makes them smell like cat pee is activated just that much more. Nice.

It's easy to find reports on Google about this, and it would seem that Nike isn't (or wasn't) taking responsibility for the problem. When I spoke with Nike this morning, my customer service rep was friendly, but either didn't know anything about the problem or wouldn't acknowledge any known issue. I'm going to send them in to Nike to return them and we'll see if they do anything for me, but the 'net has set my expectations low on that score. OMG these things stink -- I have that one there sitting next to me after my customer service call, and it's unbearable!

In the mean time, I will have to hit Sports Authority this weekend to buy Juli a new set of cleats. Adidas, I think.

All for now,

J

Tuesday, September 28, 2010

Juli's Wheels -- Lace 'em up!

Last night was what I suppose I'd consider the "big day" in my wheelbuilding class at Broadway Bicycle school -- I laced both of the hubs into the rims!

Now, on the scale of human achievement, this isn't really all that big a deal. Millions of spoked wheels are produced worldwide each year, after all. But these two are my first, and may well be my last, so I'm going to savor the experience.

So what'd I do? Well, I started with several sets of components -- two Velo-Orange Diagonale 650B rims (so shiny and pretty), a pair of sturdy old Specialized sealed bearing hubs (not shiny or pretty, but stout and bulletproof), fifty-two 276mm stainless spokes for the front and non-drive-side rear, eighteen 274mm spokes for the drive side rear, a GladWare tub full of chromed brass nipples and two different colors of Spoke Prep, which is a type of thread locking compound. Then Dave led the class through the process of lacing up the wheels.

The first step was to smear Spoke Prep on the threaded ends of the spokes. The two different colors were to distinguish the spoke lengths -- the long ones got the taupe-colored spoke prep, and the short ones got the baby blue. Using two different colors would ensure that we wouldn't use the wrong spokes in the wrong places. Except when we (I, really) did.

Spokes prepped, the lacing began. Dave gave us some tips on how to show some deliberation about the details of the wheel. Stuff like making the logo on the hub body line up radially with the valve stem hole on the rim. And making sure the valve stem hole fell in the right place within the spoke pattern, to make sure it would be easy to get a pump head onto the valve stem. Or making the labels on both rims readable from the drive side of the bike. Stuff like that, both functional and aesthetic.

Those things in mind, we started lacing. Which really means threading spokes through the holes in the hub, and running them outward to the holes in the rim, then securing them with a nipple. It wasn't as hard as I expected it to be. Really, it was pretty simple -- just a matter of knowing where to start, which spokes to thread next, and which holes to run them to, given the desired spoke pattern (three-cross, in this case, which means that each spoke crosses three other spokes on the way to the rim).

I did make some mistakes, though. I was feeling pretty chatty, and at one point I realized I was using short spokes on the non-drive side, and I had to take like 6 spokes out of the wheel, and replace them with the longer ones. Then another time, I realized I was working sort of backwards, and had to take another 8 spokes out, twist the hub a bit, and then re-lace those 8 spokes again in a different direction. It could have been worse -- I caught both mistakes myself, and Dave was right at hand to offer course correction.

In the two hours of class, I managed to get both of my wheels laced, so I'll be in good shape to start the next steps. They are still pretty floppy, and there's still quite a bit of work left to go. I have to make sure they're dished right, which will result in the rim being centered between the outer lock nuts on the hub -- necessary if you want your rims to sit smack-dab between your brake shoes, which most of us do. Then they have to be round, with the axle sitting dead-center of the rim's circle, which I think most of us would intuit the importance of. And they have to be true, so they don't wobble like a potato chip while they turn. And perhaps least obviously, they should have even spoke tension across each side of each wheel, so that the wheel isn't overly stressed at any given point, which would lead to their prematurely getting out of whack.

So the dramatic part is done -- the part that makes it look like I actually did something. But the hard work -- the meticulous and frustrating work of making the wheels right and usable -- is still to come.  One of the wheels is pictured above, sitting at a bench at Broadway Bicycle School -- can't tell which it is.  You can see it pretty much looks like a wheel.  But the spokes are slack, and the wheels unusable as a result -- you can tell because the spokes are curved, not straight (they're not under much tension).

I hope Juli will be impressed by the final results, and treasure these, her father's first (and possibly only) wheels. If she doesn't, that's OK -- I will. And I won't remind her of all my hard work before every ride, I promise. I'm having too much fun to play that card.

All for now,

J

Thursday, September 16, 2010

Juli's Wheels -- Pieces Parts

The wheel building class at Broadway Bicycle School started this week! I drove into Cambridge in one of my folks' cars, because Allyson was in town earlier this week, and she'd borrowed my Mazda for a few days. Borrowing seldom-used "spare" cars isn't always a good idea, and this week it turned into sort of a carnival of gremlins. I managed to avoid crashing into anything or being bitten. Long story.

Class was good. I'm one of three students, so it's a smaller and so far more social group than my last group. Each of us is building a different type of wheelset, with different hubs and different rim sizes, so it should be interesting to see how each project progress.

As I've mentioned before, my project will be to lace a set of 650B rims (either V-O or Velocity, depending on what's available) onto a vintage Specialized sealed bearing hubset. I think I properly spaced the rear hub for 126mm spacing (it was 120, originally), but we may need to adjust that in class. The 126 spacing will allow the rear to host a 7-speed freewheel, and then the final assemblies will see duty on Juli's new-to-her Schwinn frame (which is only a handful of parts away from being buildable).

This week, we mostly talked about what we wanted in the way of wheels, and why, and then chose parts. I already had my hubs, and knew what my rim choices would likely be, so most of the class I listened to and supported the dialog around the other students' wheels, which were being built from new and as-yet-unacquired parts. Did you know a Rohloff hub can run $1700, retail? That's a big nut, but then again, there's a little 14-speed transmission inside the thing, so it's a pretty sophisticated piece of equipment.

Apart from already knowing my rim and hub selections, I did have to make a couple of choices. I hadn't given any thought at all to spoke or nipple type. I think (can't remember for sure) I went with straight gauge DT Swiss spokes (vs. butted spokes), and I know I went with chrome plated brass nipples. The straight-gauge spokes are heavier, cheaper and not as strong as butted spokes, but these are wheels for a kid's bike, not a bike I'm going to put a thousand miles on per year.

To me, the way wheels lace up is really pretty cool. In a sense, spokes are long and skinny bolts, and nipples are nuts. The spoke winds through a hole in the hub, and then runs outward to the rim to accept the nipple. The nipple, in turn, fits through a hole in the rim and then threads onto the spoke end to hold it in place. Arrange a bunch of these around the circumference of a hub, running in a pattern to the rim, tighten them to uniform tension (either across all spokes or per-side, depending on the situation) and you have a wheel.

But there's a lot of detail in getting the wheel built right -- spoke length, choosing a lacing pattern, getting the path for each spoke right for the pattern, centering the rim properly (relative to the outer locknut surfaces on the axle), and getting everything tensioned properly and consistently. You should see the formula used to calculate the spoke length!

It should be a fun experience, and I'm looking forward to going back in two weeks to see what the Velo-Orange rims look like, and start learning how to lace the wheels up.

Then, once the wheels are built, I'll still need a few things to get the build rolling:

650B tires, and something on the narrower end to work with the chrome fork I bought for the frame
650B tubes to match the tires
Rim strips, and I'm going to try the new Made-in-America ones from Rivendell
The aforementioned freewheel
Brake and shifter cables, and housing in Juli's chosen shade of blue
A threadless handlebar stem, starnut and cap
Blue "cork" handlebar wrap
A kickstand

And probably a handful of other small parts, as well. Not a lot, though. The build should make for a good Christmas break project, I think, with a Thanksgiving tear-down of the Fuji.

I'll keep you posted.

All for now,

J

Wisdom

Have you ever known anyone really wise? Someone who says important stuff that seems to make some sense at first, but then maybe a year later you really understand what they meant and why it was important? I do. A handful, actually, but one in particular inspired this post, after several weeks' hiatus.

I'm not sure if this dynamic makes me slow on the up-take, or if it makes those people especially wise. I'd like to think it's the latter. But I will also admit to blind spots.

My advice to myself is to listen harder to wise people, and spend more time thinking about what they've said. I think I'm getting better at that, but listening is a lifelong skill that can always use more work.

All for now,

J

Wednesday, August 25, 2010

Unless you look...

I've been using my Schwinn Sports Tourer about once a week all summer. I take it out with Ava on the trailer bike, to the grocery store for light shopping runs, over to the lake for kayaking trips, and it even went to Staples for a school supply run last week. That's not a lot of use -- less than 300 miles -- but it's regular use. The bike has felt and sounded just fine, from the saddle. Other than keeping the chain lubed and wiping the wheels down to clean off the aluminum dust after a wet ride, I haven't seen cause to do anything to it.

On Monday, though, I had my last class at Broadway Bicycle School, and brought the Schwinn into town for its turn in the work stand. The topic for Monday's class was to look at the front derailleur. Though none of my front derailleurs was giving me any problems, I do struggle with setting them up right the first time during a build. I usually get the angle a bit wrong, and have to tweak that, but sometimes I also end up with a chain that overshifts and drops off the big ring, to the outside, at the least opportune time. Easy fixes, but things I should be able to avoid by setting it up right in the first place. So I was looking forward to learning tricks from Dave, our instructor.

I wasn't disappointed. I learned that I typically set my front derailleurs too high above the outer chainring (just 2-3mm). I learned the proper angle for a front derailleur (outer plate parallel to the chain while in the outer position), and that setting this always a guessing game because you can't adjust it while it's in that position. And as an unexpected bonus, I saw a real cable housing cutter in action, making quick work of derailleur housing (which has linear wire strands under the casing, rather than a helical coil of flat wire). I tend not to use this stuff because it's so hard to cut with the tools I have, but it's not ideal to use the other stuff with indexed shifters, and I should get one of those cutters at some point.

On the work stand, I saw that my front derailleur was on the verge of overshifting the chain off the large ring, that there was a little slop in the derailleur cable, and that my derailleur was a little high, relative to the recommended position. The first was probably caused by having my cranks snugged down a bit in Siena -- I don't think I ever re-adjusted the derailleur's limit screws to match the cranks' slight shift inboard. The second was either because I didn't take all the slack out the first time, or because the housing settled a bit or cable streched. And the third was just me not knowing any better. All good to catch.

But as I poked around, a couple of other things popped up, completely unexpected. For starters, I was able to hear a lot more noise coming from the rear derailleur on the work stand than out on the road. In top gear, the derailleur was on the verge of noisily overshifting the chain off the cluster altogether, and in low gear, the jockey wheel was riding right on the sprocket, which was particularly rumbly when pedaling backwards. Both were easy to adjust away, but had been missed because I hadn't checked for problems in a while -- even though I'd made major changes to the bike (like a new wheelset after my May crash).

More seriously, though, I discovered that the rear wheel was a little out of true, and that the cause was a broken spoke. These wheels have maybe 500 miles on them, and have never been abused, so this was pretty surprising - I haven't broken a spoke in over 15 years! These are factory-made wheels, but they're not assembled from junk, by any means. The rims are Sun CR18's which are a strong touring/commuting rim. The hubs are Quanta parts with cartridge bearings -- perfectly decent hubs. And the spokes are straight-gauge DT Swiss, which are good spokes used by wheel builders everywhere. The spoke broke at the bend down at the flange, so maybe it had been weakened during forming, or maybe it had been overtensioned by the lacing machine -- who knows. I just hope I don't end up breaking spokes all over the place with these wheels.

Dave suggested we replace the spoke in class, since I was there and otherwise done with my tasks for the evening. So I took the wheel off the bike, removed the tire and tube and unscrewed the spoke from its nipple. Then I tried to remove the freewheel from the hub, but it wouldn't budge. Dave tried, too. Then we double-teamed the wheel and still couldn't unscrew it. I had the same problem with this freewheel on the previous wheelset as well, but the bike shop guys had been able to get it off for me. I'll hit it with some penetrating oil and give it another shot, but in the mean time left it in place, and just curled the spoke past the big sprocket. That proved painless enough, since the spoke was on the left side, not the drive side. Once the spoke was screwed into the nipple, I put the rim on the truing stand and straightened it out.

None of these issues were hard to address (though I'm glad I found the broken spoke in the setting I did). And none of them would really be surprising tweaks to have to make sometime after a build has been completed and things have settled in. What they really reinforced for me, though, is how important it is to give your bike a deliberate inspection every once in a while -- even just once per season -- to make sure everything is adjusted properly. I've never really believed in a regular tune up, thinking that the bike would tell me during normal use if something was wrong. Finding these problems really showed me that unless you get the bike into a stand and look, you may not notice problems that could leave you sitting by the side of the road, waiting for a lift home.

All for now,

J

Friday, August 20, 2010

Wheel Building Dilemma

On Monday night, class at Broadway Bicycle School focused on wheel truing.

I brought the Shogun into Cambridge for class, because it has the oldest set of wheels in my fleet -- an old but otherwise nice set of mid-'80's Shimano 600 hubs (a 6-speed freewheel hub in back) and charcoal anodized Mavic MA-40 rims. I had meetings on Monday afternoon, so my once-delayed plan to go into town on the T didn't pan out, again. I did drive in early enough to ride around a bit, but then a thunderstorm hit, so I retreated to my car.

The truing exercise was surprisingly easy, particularly since we were able to use nice Park wheel truing stands. The wheels were both out of true -- a couple of millimeters warped across a half or third of their circumference, rather than having a particular trouble spot. Once they were straight, I could feel that the spokes were pretty unevenly tensioned, so the rims themselves may no longer be straight. And their sidewalls are pretty worn, so they could stand replacement at some point.

To that end, the wheel truing class was really the reason I took this course -- so that I could sign up for the wheelbuilding course, which I did yesterday! In just a few weeks, I'll start the process of building a set of wheels. The question, now, is what to build?

When I last posted about this, my plan was to build up a new set of wheels for my Columbia straight-bar cruiser, put a front brake on it, maybe get some cantilever brake posts brazed to the rear triangle, and make that into an errand/around town sort of bike. I even picked up a set of SR hubs, a single speed freewheel and a set of 26" rims. From a cash outlay perspective, I'd need only go buy spokes to lace up a set of single speed, fat-rimmed MTB wheels in class.

A lot has changed since then, though, and that project doesn't make sense to me anymore. The Columbia is going on eBay shortly (no calls from Craig's List), so I'm not really interested in building up wheels for it. I also think I'm going to offload those wheel components I'd picked up, because I don't see a project that'll require a set of 26" single speed nutted-axle wheels in my future anymore. So no -- not those wheels.

Other candidates? Well, I recently bought a set of inexpensive but decent 650B wheels to use on Juliana's Schwinn, and confirmed that 650B rims will work well with that frame, both in terms of bottom bracket height and brake reach. There is one significant problem with that wheelset, though -- rear hub spacing. The rear hub is a mountain bike hub, spaced at 135mm, and this is an older road frame spaced for 120 or 126mm hubs. I've tugged at and spread the rear triangle enough to get the wheel into place, but the dropouts are noticeably no longer parallel in that position. That may compromise how well the quick release bites the rear dropouts, which may be a safety issue. I also suspect the rear derailleur alignment will be problematic with that setup.

So a second wheel-building option is to build up a set of 6/7 speed 126mm wheels for her, using a set of freewheel hubs I have. These are nice 36-hole Specialized cartridge bearing hubs that came with the Motobecane -- the core of the wheelset I destroyed in my Schwinn's crash in May. That would be a nice wheelset for Juli, and it would work much better with her frame. If I take this path, I'd have to shell out for a new set of rims, and then I'd have that other 650B wheelset kicking around. Waiting for a build for Ava, I suppose.

Still another path might be to build up an alternate 27" wheelset for the Schwinn, or another 700c wheelset for the Motobecane. I could build lighter wheels for the Schwinn, or sturdier wheels for the Motobecane, for example -- the opposite of what's on each bike today. But the wheelsets on both of those bikes is well-matched to the way I ride them, and both have low miles on them, so an alternate wheelset really isn't necessary. I'd be answering a question I'm not asking myself, there.

I guess I could also rebuild the Shogun's wheels, since the rims probably ought to be replaced. But I'm probably going to sell that bike as a single-speed in the spring, after taking the derailleurs off for Ava's Fuji build, swapping the chainrings and chain, and screwing on a single-speed freewheel and some shifter boss caps. I may try my hand at re-dishing the rear wheel to make it stronger, but putting new rims on that bike would be little different than throwing money away on the Columbia. Worse, it'd cost more than that option, because I have no 700c rims lying around.

Given the choices, I think building up a set of 650B wheels for Juli's bike makes the most sense. It's not the cheapest path, and it will leave me with an idle 650B wheelset for a while. But it's the safest path for Juli, and of all the choices, it's the one that will provide the most utility. So I will need to find a set of 650B rims. Maybe a set of high-polish V-O Diagonale rims? Velocity Synergy symmetrics? Whatever I settle on, it seems I'll be doing my part to help the 650B movement along.

I'll try again for the bike exploration in Cambridge next Monday, with the Schwinn, this time. It has lights and a lock, and I'd be comfortable locking it up outside on a rack while I check stuff out. The last class is a front derailleur class, and it's as good a bike as any for that. None of my front derailleurs really needs adjusting, but I always have to fuss with them after a build, so I'm hoping I'll learn some alignment tricks. Picking up little tricks from experienced hands has really made the class worth my while, and I'd recommend it even to folks who've spent time wrenching their own bikes. Particularly, if like me, that's been a process of learning through doing, rather than learning through instruction.

All for now,

J

Sunday, August 15, 2010

Three-Up


I like this photo. I took several from different angles, and this view of the business-end of our bikes seemed to best capture them. This was taken early yesterday morning, before we headed out to Lexington for the MassBike summer family ride. That's Juli's Fuji, Ava's Trek trailer bike and my Schwinn Sports Tourer, left to right. There's room for one more up there, I think, with the right combination of mounts, spacing and orientation of the bikes.

The ride was good, but I don't have much to share from it. The 22-mile loop took us from Lexington High School into the Concord Battlefield/Hanscom area, over to the Old North Bridge, then into Bedford before cutting back down to the starting point. I have a couple of photos of the girls at the Old North Bridge, and a couple more of them eating ice cream at Bedford Farms.

It was the longest ride Ava's ever taken. Juli's been on one ride longer than this with me in the past, but I think that was on the trailer bike, and this was her longest solo ride to date. And it was their first organized group ride, too. Several milestones in there, and high-fives all around at the finish.

All for now,

J

Thursday, August 12, 2010

650B Schwinn World Sport


It's not done yet -- not even close. But today I received the 650B wheelset I bought to try out with Juli's Schwinn, and it's official -- the bike will be built up as a 650B.

The wheels are basic, but perfectly serviceable. They've got inexpensive Deore hubs laced to inexpensive Weinmann ZAC19 rims. Hubs, skewers and rims are black, and spokes and braking surfaces are shiny, and it's a combination I think works pretty well. They won't knock anyone's socks off, but they should perform well for as long as Juli needs them.

The bike was built for 27" wheels, but it will support this smaller wheel size just fine. At the rear, the brake bridge is well-placed (if shabbily welded) for this conversion, allowing a Dia-Compe 750 centerpull to reach comfortably to the rims while using only about half of their adjustment range. The long and dorky fork, on the other hand, requires all of the available reach, which you can kind of see in the photo. Honestly, I was surprised by that, because it's not uncommon for the rear triangle to use up more brake reach than the fork -- my own Schwinn Sports Tourer is that way, for instance. Some older 10-speeds even used different brake sizes at either end -- a Weinmann or Dia-Compe 610 up front and a 750 in back. But that's OK -- the fork is coming off anyway, in favor of a 700C lugged fork (in chrome), and that will no doubt take an inch or so out of the fork legs -- a 650B wheel might even work with a shorter-reach 610 brake after that swap.

Swapping the fork is going to drop the bottom bracket a bit more than the wheel swap alone, and also steepen the head and seat tube angles. The angles they look pretty relaxed as it is, so I don't think the bike will be flighty or anything, but I'm a little concerned about bottom bracket height. Juli is running a 165 crank, so there probably won't be a problem, but I'll have to pay some attention to that, and will hold off on buying tires until I've had a chance to measure things out with the new fork. A little extra loft through a poofier tire might be called for, there. She's already had a pedal-grounding crash on her Fuji, so she understands the perils of pedaling through corners, but I don't want to handicap her with too little clearance, either.

It will be quite a while before the bike is ready to ride, though. I can still do a little work here and there, but most of the drivetrain is committed to the Fuji for the rest of this season, so it will likely be the end of this year before we get to the build stage. In the mean time, I'll keep gathering parts, and looking forward to what should prove to be a neat little bike.

All for now,

J

Wednesday, August 11, 2010

Fuji Feedback

On Monday, I took Juli's Fuji to my bicycle maintenance class at Broadway Bicycle School. It was headset night, and of all the bikes in my charge, it's the most needy in that department.

I'd intended to get into town way ahead of schedule on the Red Line from Alewife, and sort of beat around Cambridge, reacquainting myself with the place. But I got sleepy from my ride (24 miles out to Tufts Veterinary School and back), and then I was called for a phone screen for a job I'm really interested in, which was more important than beating around Cambridge for a couple of hours, reacquainting myself with the place. So instead, I got there just before the shop closed up at 6:00, and bought a T-Shirt for myself, another as a gift, and a couple of Crane hammer-strike bells, before then waiting on a bench outside for class to start.

Funny thing about Cambridge. I mentioned last week I got a couple of laughs and hoots and the like while riding Ava's teeny mountain bike to class. This week, people made comments like "Hey, uh... I think you need a bigger bike" as I walked Juli's Fuji from my car to class. All said kindly and all in good fun, of course. But in truth I kind of marveled that people said anything at all. I've written in the past about how bikes can often be an ice-breaker, but even so, random interaction with passers-by is a new experience for me.

And it kept coming! As I sat on the bench, I think three separate people walking or riding by said something like "Nice bike! But it's not yours, right?" And as the Broadway crew started putting away the bikes hung outside for the night, they complimented the bike as well, and asked me about it. I told them what it was, and how Juli and I had built it up a few years ago, and to no surprise (these are bike people, after all), there were nods and smiles and approvals and reminiscences of first bikes. All good stuff, and great reinforcement of the notion of bikes as bridges.

Class was good, too. I got a good look inside the Fuji's 105SC headset. It's a nice part, with seals that pop into place to keep dirt out of the bearings, and a recessed slot for the lock washer to ride in, which lowers the stack height a bit. The races have just the slightest little indentations hammered in by the stresses on the ball bearings, but it wasn't bad. With the headset overtightened, these give the fork the feel of having several distinct "positions", rather than pivoting smoothly, but it isn't really noticeable when the headsed is adjusted properly.

The big take-way from class was again that a professional workstand is a beautiful thing. My home made workstand is a big step up from working with a bike upside down on the floor, but a professional work stand is another big step up from there. Apart from the lack of wobble, I was able to rotate the bike entirely upside down and lock it there, in order to load up the lower headset cup with uncaged balls without them falling out onto the floor. How cool is that? It makes everything sooooo much easier. Maybe someday I'll have a real shop to work on my bikes...

Next week is wheel truing night, and this time (for real!) I'll plan to bring the Shogun in early on the T (which is OK, according to the MBTA website, but not at rush hours), and use it to explore Cambridge a bit before class. I can even ride it around, which I mostly couldn't do with the Fuji. After class, I'm going to stop at a falafel place I saw just outside of Central Square for dinner, I think, before heading back to the red line. It's been a long time since I had falafel, and I hope it's good!

I really like that city.

All for now,

J

Tuesday, August 10, 2010

Progress

With every new bike project, there's a stage of planning what I'll need, which overlaps with the process of gathering enough stuff to build the critical mass of parts that comprise the fundamentals of a bicycle. For Juli's Schwinn, that process has been surprisingly quick, and I have most everything I need, already, along with some stuff I don't strictly need, but wanted to include in the build.

On Sunday, I took the girls to the Museum of Transportation for Bicycle Day. There's a concours plus a swap meet (which we also went to last year), and the museum itself is open, with a neat collection of old, very old, and extremely old cars. It's a fun way to spend a couple of hours on a hot August morning.

Last year, I was looking for a clunker, and walked away with the Columbia straight-bar cruiser I've written about up here. I just put that bike on Craig's List, btw, along with the rusty parts bike, as part of the process of paring back on my bicycle hoarding. This year, I was looking for a couple of missing pieces to Juli's Schwinn build. We ended up walking away with a narrow drop bar, along with a complete Dia-Compe 750 centerpull brake caliper to add to the pile of parts.

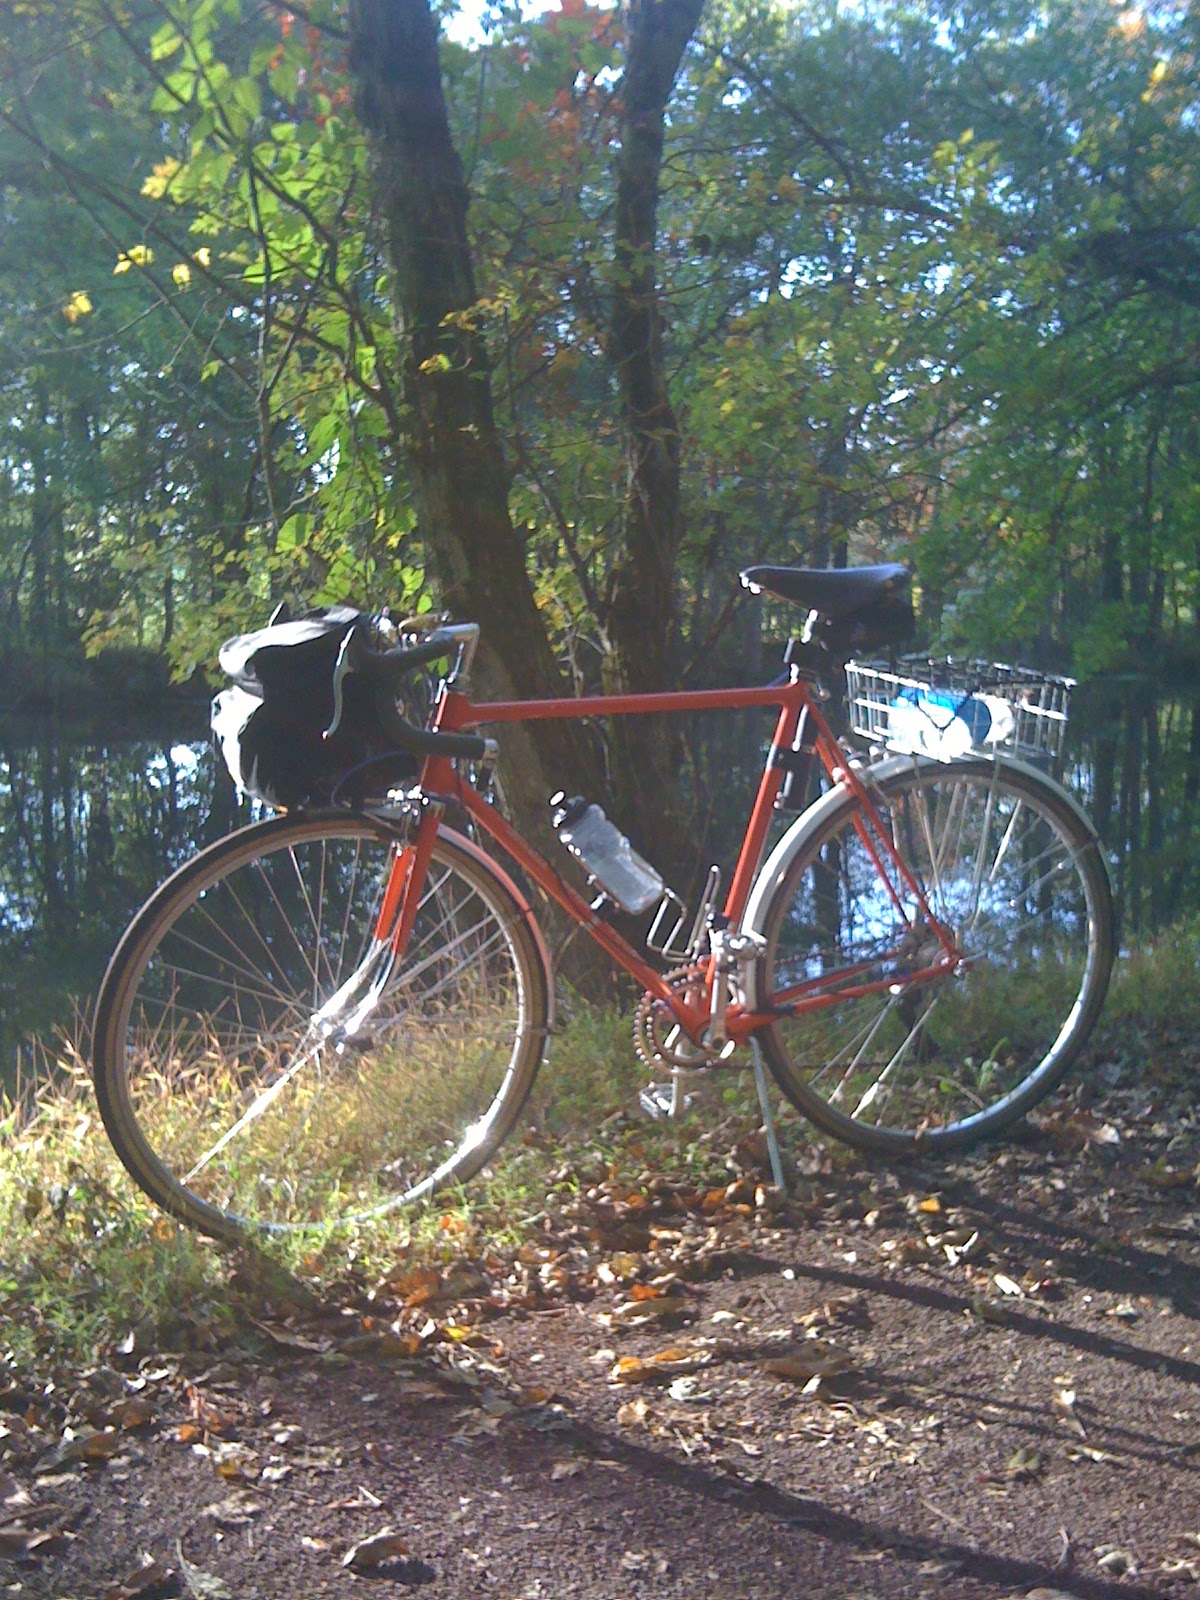
Actually the Dia-Compe isn't going to go on her Schwinn, but I did install it on the trailer bike, in place of the newer 750 centerpull that was on there. So now I have a matched set of 750's and a matched set of 610's for Juli's Schwinn -- that should give me all of the combinations of brake reach I will need to get the bike rolling. More on that in a bit.

Along with the brakes and handlebar, I've got a Nitto stem with a 50mm reach, a 26.4 seatpost, a new JIS-spec headset, and a front brake cable hanger all waiting. The brake levers, derailleurs, saddle, saddle bag, cranks, pedals, bottom bracket and shifters on the Fuji today will all be moved over to the Schwinn for her to keep using. It's all good stuff, and it will swap over neatly. Juli loves her Pletscher, but that one was modified expressly to fit the Fuji, and will stay with the bike, along with the headset. I've picked up another Pletscher to install on this bike, and will modify the rear struts as needed, to make the rack sit level -- it's a small frame, and I'm pretty sure it won't sit level out-of-the-box.

What's left? Well, I need a seatpost binder bolt, a chain, a pulley-style brake cable hanger for the rear brake, some cables, a kick stand, some handlebar tape, a gear cluster, and of course a pair of wheels. The wheels will be fun to sort out. 27" or 700C wheels will fit fine with the 610 Dia-Compe brakes I have, so the default path is to pirate the 700C wheels from the Shogun. These were Allyson's wheels originally, and they're getting up there in years. The rear is a little out of round, so I'm going to see if I can touch them up next week in my maintenance class, and if not I'll build a new set of wheels around those hubs in my wheelbuilding class, whenever I take it.

But the current question is whether or not I can use a set of 650B rims on that frame. I'm guessing that the brake mounts are too far away from the dropouts to do so (the bike was designed for 27" wheels), but I want to be sure. So I bought a set of 650B wheels (Deore Hubs, Weinmann rims) on the cheap on eBay the other day. Ridiculously cheap for new wheels, actually. Less than half what I paid for that new set of 27" wheels post-crash for my own Schwinn. More like a third -- including shipping. We'll see if the 750 Dia-Compes reach to the 650B's. If they don't, they'll still be good to have for a future project -- maybe Ava's bike post-Fuji. It'll be fun to figure this all out!

Back to the swap meet, I had a couple of firsts, and a few temptations. The firsts, first: There was an Alex Singer bicycle there, and a fully chromed Paramount with red decals and lug lining and red cables. I have a soft spot for fully chromed Schwinns -- both the Voyageurs and the Paramounts. But in truth, I've never seen a chrome Paramount in person. It was just gorgeous, and I'd personally love to see more chromed frames out there. I know chrome plating is a toxic process, and I understand the frames are actually subject to more/worse corrosion problems than painted frames. But even so -- they're beautiful. The girls agreed, so it's not just me!

The Singer was a feast for the eyes, too, with all kinds of interesting details -- like the custom decaleur up on the handlebars, the little reinforcing braces on the front of the Mafac brakes, and much more. I should have brought a camera, but totally forgot. I've never seen a Singer, and it was a real treat. It was even a good size for me, but the seller was asking more than I've ever paid for a bike, and more than I'd consider paying for one. I'm not sure whether I'd enjoy the riding experience as much as the ogling experience.

As to the temptations, one of the constant shell games I play in my head with my bikes is the notion of getting rid of my Schwinn Sports Tourer and replacing it with a bike I can set up as both a utility bike and a touring bike, swapping back and forth with relative ease. I've come very close to doing that with the Schwinn and calling it a day, actually. But the Schwinn is one size too small, and has enough oddities in its specs that it's sometimes difficult to find the right parts for it. The handlebar or stem is making a creak right now, for example, and it's making me nervous. Tightening the quill bolt and bar clamp don't help, and I can't go buy a new Nitto stem for it, because it accepts a 21.15 quill, not a 22.2. I have other 21.15 stems, but their bar clamps won't allow a drop bar to thread through -- they're too wide and not cut out, because they were made for upright bars with wider-radius curves. So it's just a bit of a pain sorting stuff like that out, though the plan itself is still valid.

Anyway, a slightly larger and purpose-built touring frame would be a nice swap at some point, and there were candidates at the swap meet for me -- a nice Lotus touring bike set up with a mountain bike bar, and two Motobecanes similar to my own, but slightly larger and with eyelets on the dropouts. Ultimately, the Lotus was the most interesting, with the nicest components and the greatest utility. But it was also the most expensive, by a factor of two, and I didn't think it was that nice. I figured the bargain Motobecanes would be too much trouble to refit, given their French specs -- and the point is that I want something less fiddly, not more so. I passed on all three, but am going to keep my eyes open for a good bike to bring to France next spring. The Schwinn would do the trick just fine, so I always have it as a fall-back.

So, some progress over the past few days. Not necessarily for my own fleet, yet, but progress just the same.

All for now,

J

Monday, August 9, 2010

Hawks

When I was a kid, there were very few hawks around, thanks to DDT. I recall my dad pointing them out to me, excitedly, when we were out driving on the Pike or whatever, but I don't have any specific memories of seeing them until I was maybe 19. I was home from college in my last summer at my parents' house. I remember washing one of my dad's cars out in the back yard, and was crouched down, scrubbing a rocker panel or lower door or something. When I stood up for whatever reason, I was just in time to see a hawk swooping down low, just on the other side of the car, and no higher than my head, checking out the remaining members of the flock of chickens I'd kept as a kid. It immediately climbed up and away over the back field, either because it realized they were too big to carry off, or because of my presence there. It's a great memory.

These days, it seems like I have to elbow hawks out of the way to get out my front door. I see them sitting in trees alongside the highway, while commuting. I see them wheeling overhead, hunting, when I'm out in the yard. I've seen a pair of them, chasing through the trees in my yard, squabbling over a kill (a headless chipmunk, which was dropped in the fracas and recovered by neither party). I've even watched with Juliana as a hawk invaded a bird's nest in a tree alongside the driveway, and made off with a couple of chicks, as the parents protested noisily nearby. Sharp-shinned hawks are common to the area, and apparently do that sort of thing. It was sad to watch (particularly for Juliana), but at the same time, it's probably something neither of us will witness again, and we should count ourselves fortunate to have been there at that moment.

Anyway, hawks appear to have recovered from the decimation (or worse), though I've never researched the subject to see if that's true from a population statistics perspective. Wild turkeys, too, which are also everywhere these days. I saw a peacock out in Lexington next to the on-ramp to Rt 2 a couple of years ago, tail and all, but that was probably more an escapee than anything.

Anyway, even with their comeback, one thing I'd never heard in person before last week is the piercing cry that hawks are credited with in the movies. All of the hawks sounds I've heard around the yard have been sort of pathetic squawky seagull/chicken noises, rather than that noble cry that spikes early and tapers off. I'd sort of assumed that the hawks we have around here were species with lesser voices.

But the other day, I was walking Jake at the local conservation land, and as we were heading up the first hill, I heard that signature hunting cry from overhead. It was a little hoarse, and a little less majestic than the movie version, but close enough. I looked up and saw a hawk wheeling in close, looking for a meal in the pasture. A very cool first, and it made me smile.

All for now,

J