Saturday, November 20, 2010

650B Schwinn Build, Day 1

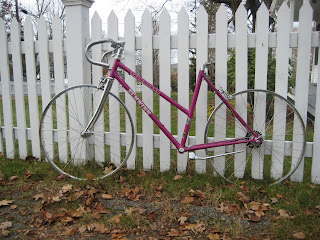
This is a weekend I normally wouldn't have had the girls. But Ava had a play date today, so their mother asked me to take Juli for a few hours. Yay! In addition to doing a few chores, we spent about an hour on Juli's Schwinn, taking off the parts I'd test-fit, washing and waxing the frame and fork, and starting the bike's build, for real.  We have a long way to go, as you can see, and the process will likely be broken into several sessions, but the build should go quickly.

In anticipation of this, I'd moved my bike stand back up into the attic, along with my bike tools, the Schwinn itself, and Juli's old Fuji, which will serve as a donor bike.  What doesn't get donated to the Schwinn from that bike will come off and go into a box, so that I can ultimately send that frameset out for a strip and repaint on Ava's behalf before its next build-up.  If I'm completely off my rocker when the time comes, I may also get shift cable stops and a pair of bottle cage braze-ons installed in the process.

The big thing worth mentioning about the build so far is the headset, whose final state you can see here.  As I mentioned last time, we're using a threadless headset with a top nut from a threaded headset, a NOS Suntour locknut to keep the top nut in place, a stack of 1" headset spacers, a 1" threadless cable hanger, and a Nitto 50mm quill stem.  The steerer tube is long, and it has only a couple of inches of threading.  On this frame that's not enough to allow the use of a threaded headset, and too much to allow for a threadless headset, cable hanger and stem, if the threaded part were hacked off.  So this mash-up was cobbled together, and it seems to be working just fine, in that the fork turns and nothing seems to be doing anything untoward.  I'll let you know how it holds up in service.  We did rearrange the stacked parts, relative to the test-fit, to get the stop a little lower than it was.  The handlebars are old French bars -- nice and compact for their intended user.  One thing I noticed is that the handlebar collides with the top tube at full lock.  The bike will have bar-end shifters, but I might twine and shellack that spot on the top tube, both to protect it and to cover the blighted paint that's in that spot today (apparently this isn't new to the current bar and stem combo).

The brake calipers are in place, sans pads or cables, and when we finish the rest of the brake installation, I'll share more about the two unorthodox features of the brake setup.  We're using Dia-Compe centerpulls (610 and 750 reach, front and rear) with the hope that they work better for Juli (who'll probably weigh no more than 110 lbs during this bike's service to her) than they did for me on my Schwinn.  If they still suck, we'll find another solution.

The Greenfield kickstand is bolted into place, and I'm hoping the frame's kickstand plate will keep it from moving around down there (I remember these things drifting around when I was a kid). I might also twine and shellack the kickstand arm to protect the crankset. Might. We'll almost certainly have to trim and file that arm once we have tubes and tires installed on the wheels, to get the right lean.

Speaking of tires, once the bike is on its rolling stock, we can level the saddle and handlebar, and also figure out how much to trim the Pletscher struts so the rack sits level to the ground when installed on this little frame.  I suppose we could do that without tires, too, but I don't like setting a bike on the ground on bare rims.
We installed the crankset, which is the same one that served Juli well on the Fuji, as well as the saddle and one bottle cage from that bike. The crankset is a 165mm Bontrager part with compact rings (36/50 iirc), and it mates to a Truvativ ISIS bottom bracket. The saddle is a Brooks B17, in honey.  And the bottle cage is just a Specialized cheapie.  Other components and accessories will make their way over from the Fuji in later sessions, including the rest of the drivetrain, the control levers, another cage on an auxiliary mount, a bell, a saddle bag and a blinky.

I also ordered most of the last of what we'll need, today.  During the work we did today, I noticed a few more things we'll have to install, but even so, the list is short:  tires & tubes, a cable stop for the seat tube, brake pads, a pair of barrel adjusters, a chain, and a plastic cable guide for under the bottom bracket.  I couldn't get that last part from Rivendell, so I'm going to hit my LBS for that sometime in the next week or so.  The rest should be here after Thanskgiving.

Anyway, Juli seemed to have fun, and she seems fully over the pinkness of it all, now that the bike is coming together.  She greased the headset races, installed the rear brake and water bottle cage, washed the frame, and seemed enjoy stroking the freshly waxed paint and chrome.  Don't we all, though?

All for now,

J

Sunday, November 14, 2010

Juli's Pink Schwinn Taking Shape


I received some parts this week intended for Juli's next bike, so I spent a few minutes today trying out my bastardized headset idea, and then test fitting some parts.  As you can see, the pink Schwinn frame is starting to look like a bike!

Currently on the bike are a Dia-Compe 610/750 brake combination, a pulley for the rear brake cable (which on this frame will approach the seatpost clamp area from below, not above -- I'll detail this when I write up the build another time), a Greenfield (made in USA!) kickstand, a Shimano 12-28 7-speed freewheel, the 650B wheelset I built up in class, a seatpost, stem, handlebar, and the aforementioned headset.

The day after Thanksgiving, Juli and I will start the build process in earnest, beginning by taking everything you see off the frame, and giving it a good scrubbing and polishing.  After that, it should go together pretty quickly.  We have most of the parts we need (beyond what's listed above), save for tires & tubes, fresh brake pads and control cables.  Blue handlebar tape and cable housing are sitting in a box out in the barn, along with a Pletscher rack that I'll modify to sit level on this little frame (as I did for the Fuji, by shortening the support struts).  The drivetrain, control levers and saddle will be scavenged from Juliana's Fuji, along with key accessories, like the bottle cages, blinky and saddle bag.

As for the hybrid headset, it seems pretty sound to me.  The headset is threadless, but the steerer tube is threaded.  There is a locknut near the top of the spacer stack, and the threaded top-nut, as you can see.  For the test fit, I put a spacer between the lock nut and top nut, but in the final build I may move that under the locknut, and play with the order of spacers and hanger in the stack, to get the cable hanger as low as possible.

The girls' mother stopped by with the girls today to pick something up, just as I got to the stage you see, here.  Juli was all smiles, seeing her new bike, and offered the verdict that the dreaded raspberry-pink frame is overshadowed by all the shiny metal, making it acceptable.  As long as the cables and bar tape are blue, that is.  We'll see how long that position lasts!

It should come together quickly, from here, and be ready for Juli to use as soon as the weather warms up enough for riding, next Spring.

All for now,

J

Friday, November 12, 2010

Huret Dropout Adapter

Here's my first pass at an engineering drawing for the adapter I made for my 1972 Schwinn Sports Tourer.  This simple little part installs on the derailleur mounting/pivot bolt, and sits squeezed in between the derailleur and the dropout.  Its purpose is to fix an incompatibility between modern derailleurs and an old Huret dropout.  The Huret dropout has the derailleur adjustment screw flat maybe 30 degrees farther forward than does a modern dropout, and the adjustment screw on a modern derailleur won't connect with the flat at all.  This adapter provides a new flat in the right place for a modern derailleur.

All dimensions are in mm.  Start by taking a little scrap of 1-1.5 mm sheet metal (I used chrome plated brass that started life as some sort of washer), and cutting it like so:


If you could get it to scale right, it would be great to be able to print this image on a laminating sheet and just stick it onto your sheet metal as a template.  I'll see if I can figure out a way to post a file that's 1:1 scale.

Anyway, once you have the thing cut out, file the edges smooth so you don't cut yourself.  I'd even round off those pointy tab corners a bit.  If you use brass like I did, filing takes no time at all.  Then drill a 10 mm hole up at the top, there, and file its edges too.  The hole is oversized to accommodate adjustment.

Then the next step will be to fold the part on the three lines toward the bottom (sorry, I couldn't figure out how to dash the lines) using a pair of needle-nose pliers.  The two tabs at either side fold towards you about 110 degrees or so -- past vertical anyway (you'll need to fiddle the correct angle during installation, so don't sweat that too much).  Then the rectangular flap with the (now folded) tabs folds up 90 degrees so that the tabs now sit along the body.  The tabs' angle should be about radial to the hole.  The little box section formed by the three folds is installed facing away from you, fitting up against the dropout's adjustment flat.

The drawing is nothing fancy, yet.  But I'm used to freehand graphics packages, not tools that expect accurate measurements.  Next up, I want to make the drawing 3D, and figure out how to fold it in the software to give a preview of the finished part.  And I'll take a picture of the installed prototype adapter so you can see how it fits.

Should be fun!

All for now,

J

Sunday, November 7, 2010

New Projects, New Work

I started working again a couple of weeks ago at a company that makes CAD software.  I'm doing Product Management work, as I have for a long time, and so far it feels like it'll be a great place to be.

I'm not managing a CAD product, but rather a cool new social app that they're building.  Even so, knowing the core products is always important, and I've got a few things in mind that I want to do to get up to speed -- starting by creating a schematic for the adapter shim I made for the Huret dropout on my 1972 Schwinn Sports Tourer, to allow it to support modern derailleurs.

The goal is simple -- take the adapter off the bike (now that it's likely down for the winter anyway), measure its key dimensions and get them into a blueprint.  Mostly I want to learn the products, but I'll also have something of value at the end.  Probably only enough value to share freely rather than do something commercial with, but even so, something of value to fellow tinkerers.

It should be a fun project, and I'm hoping to get it done this week.  I'll let you know how I fare.  After that, I have a front rack I'd like to design -- a sort of variant on the one I bought over the summer that didn't work with the fork or brakes on the Motobecane.

In the mean time, I've ordered the headset spacers and cable hanger needed to try out the unusual headset build I wrote about last time.  And the next step for the build is to take the frame into the basement with a bucket of water, some rags and some simple green for a thorough cleaning.  It's a little chilly to do it outside, now, but I want it clean and waxed before Juli and I get the build rolling this winter.

All for now,

J